
.jpg)
.JPG)

.jpg)
.jpg)


.jpg)
.jpg)
.jpg)
.jpg)
.jpg)
.jpg)

As you may have read in this post I needed a style that would hold up well in the water. A has been swimming a lot and her two strand twists did not last.
I decided to cornrow A's hair this week in two layers. I added some criss cross cornrows in so it wouldn't be too plain, pulled it half back and added some Gymboree korker bows. I'm pretty sure this style will last at least one week but hopefully it lasts longer than that. I will keep you all posted. Of course I used my new favorite styling products from Bee Mine. This style took about 2.5 hours total.

If you do not know how to cornrow, clickhere!
Instructions:
- I banded A's freshly washed hair in four sections the night before using ouchless ponytail holders and Bee Mine Luscious Moisturizer
- In the morning I took the bands out and finger detangled her hair a little bit, I then parted her hair from the back of the ear all the way to the other ear. I tied off the back section/bottom layer and got started on the top.
- On the top section of her hair I started by her right ear parting one slightly slanted section of hair. I applied Bee Mine Curly Butter to that section and cornrowed it.
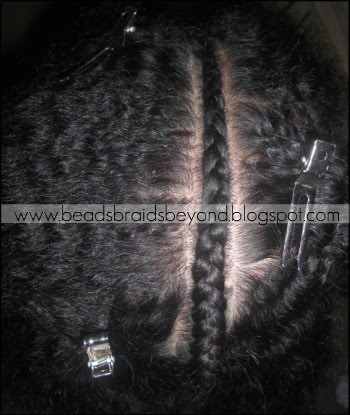
- I then parted out enough hair out for three cornrows (about 2 inches in width). I wanted to do criss cross cornrows, but I wanted to cross those cornrows over one straight back cornrow.
- I parted three sections from the 2 inch section I had. I then got the left section and right section out of my way by using slide in clips.
- I applied Bee Mine Curly Butter and did a simple straight back cornrow.
- After cornrowing that section I started to part the hair that I wanted to cross over the straight back cornrow. This picture shows I parted three horizonal lines in each section. I lined the lines up so they were even. I then used slide in clips to get the parts of hair I didn't need out of the way.
- I started from the top section that was on the right of my straight back cornrow, as I cornrowed that small section I, of course, ran out of hair so I did a regular underhand braid until I met the middle section of hair that was on the left side of the straight back cornrow. I then began picking up hair and adding it in to my braid to begin the cornrowing process over. After I ran out of hair, I once again started doing a regular underhand braid until I met the last section of hair that was in the right cornrow. Basically, start from top right section, cross over to left middle section, then cross back over to the last right section.
- I repeated the process on the other side.
- I continued the entire cornrowing process on the top layer of her hair. As stated, I started with one slanted cornrow, then did the criss cross cornrows over the straight back cornrow, then I did two straight back cornrows, then the criss cross cornrows over the straight back cornrow, repeated until I had the same thing on the other side.
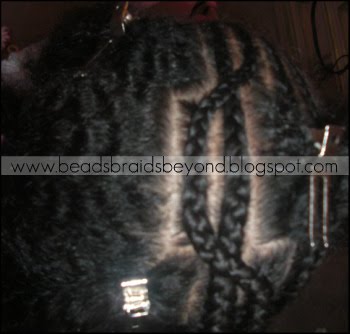
- After I was done with the top I tied it off and began the bottom layer. Simple straight back cornrows. I lined my cornrows up with my top cornrows so they were even and repeated all the way across until I was done!
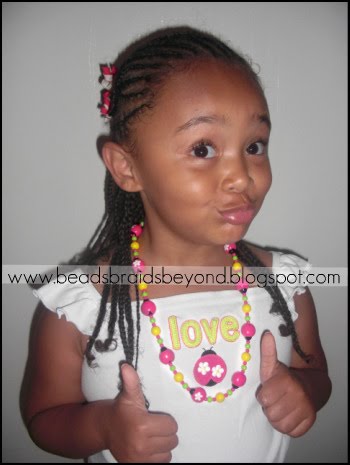
- I pulled the top layer up with an ouchless ponytail holder, added some korker bows and she was all done. You can add beads or barrettes if you would like.


"So, A, how do you like your new style?"
"Two thumbs up" :P
What's going on with your childs hair this week?
.jpg)

Love the face in the last pic:) Very cute!
ReplyDeleteThis comment has been removed by the author.
ReplyDeleteThis is a very pretty style! Excellent job on the instructions! I love how you cover each step. A's face is priceless in the last pic! Lol!!
ReplyDeleteYour cornrows are so pretty. Great style!
ReplyDeleteI really like this one. Very cute!
ReplyDeleteShe's gorgeous! Fab style! :)
ReplyDeleteLol she has so much charisma. I never thought to start the criss cross braids the way you did in the pics. I'll prob give this a try and see if they look better with your technique
ReplyDeleteI still have not become brave enough to try to cornrow my daughter's hair. I don't know why I have such anxiety about it, especially when the result is so darn beautiful. We opted for some box braids and ponytails this week!
ReplyDeleteYou Rock!!! I'm Taking this Idea and will post it on my blog (with your link attached).
ReplyDeleteVery cool! Love your inventive hair styles! Your daugther is gorgeous.
ReplyDelete-Deb for Ouidad
This is really cute. If this doesn't hold up in the water, then she must be swimmin' like a fish!
ReplyDeleteCute!! Where did you find the korker bow?
ReplyDeleteWow, I can't believe you did that, on long hair in 2 and half hours!! Great job!
ReplyDeleteyou are so creative. i think this will hold up much better than the twists.
ReplyDeleteLove it! and such a great picture! :D (the last one)
ReplyDeleteBEAUTIFUL AS ALWAYS!!!! YOU HAVE SKILLS... :-) AND A IS SO ADORABLE!!
ReplyDeleteLove dat face!!!
ReplyDeletecute
ReplyDeletevery cute you are sooo creative NIki
ReplyDeleteHi Nikki, i love this style, jen has been wearing two pony's one on either side of her head which have all been cornrowed up. I was so impressed with this style that i actually bought some Bee Mine products...the sample sizes but i gotta start somewhere, I got the curly butter, lucsious moisturiser and the shampoo...jens hair is growin fast so hopefully i can do this style next time xx
ReplyDeletethat is super cutee!!! awesome job :D
ReplyDeleteI'm going to make it my mission to learn to cornrow this summer!! I have to try all of these styles...love them :)
ReplyDeleteVery pretty. That's exactly how I do my boys hair with the criss cross braids. I also use the metal clips to help hold their hair down and out of the way, when they are getting designs...they are life savers.
ReplyDeleteA looks too cute doing the thumbs up.
I always said that I would braid my daughter's hair in cris crosses, but I didn't know how. I'm going to get my manequin head to practice on tonight! Thanks for the tutorial.
ReplyDeleteA's face in that last pic is priceless...too cute!
ReplyDeleteSee my version (fast version) at
ReplyDeletehttp://mylittlerascals-letty.blogspot.com/2010/06/copy-cat.html
THank you for the inspiration!
Nik once again you have me inspired tonight we are braiding hair!!!
ReplyDeleteI really appreciate the detail instructions and photos for the criss cross method because I have tried to do something similar (major FAIL).
ReplyDeleteher facial expressions are too cute for words.. such a diva..
ReplyDeletethank you for the instructions for the criss cross makes it a lot easier to learn when it's put in photos and explained.
Gourgeous style.
ReplyDeleteAnd you're amazing to cornrowing.
I'm practicin doing cornrows for the times, and they gets okay, but i cant doo cornrows in a speciel patter.
How long time did it take for you to learn it completly? And do you have some tips? :)