Tuesday, December 3, 2013

Natural Hairstyle for Kids: Fish Bone Cornrows

By Aisha of Braid with Me 

We're back with a new style!! It has been such a long time since our last post. Anisa is now a 4th grader!! Where has time gone?? My baby is growing up! 


The Style
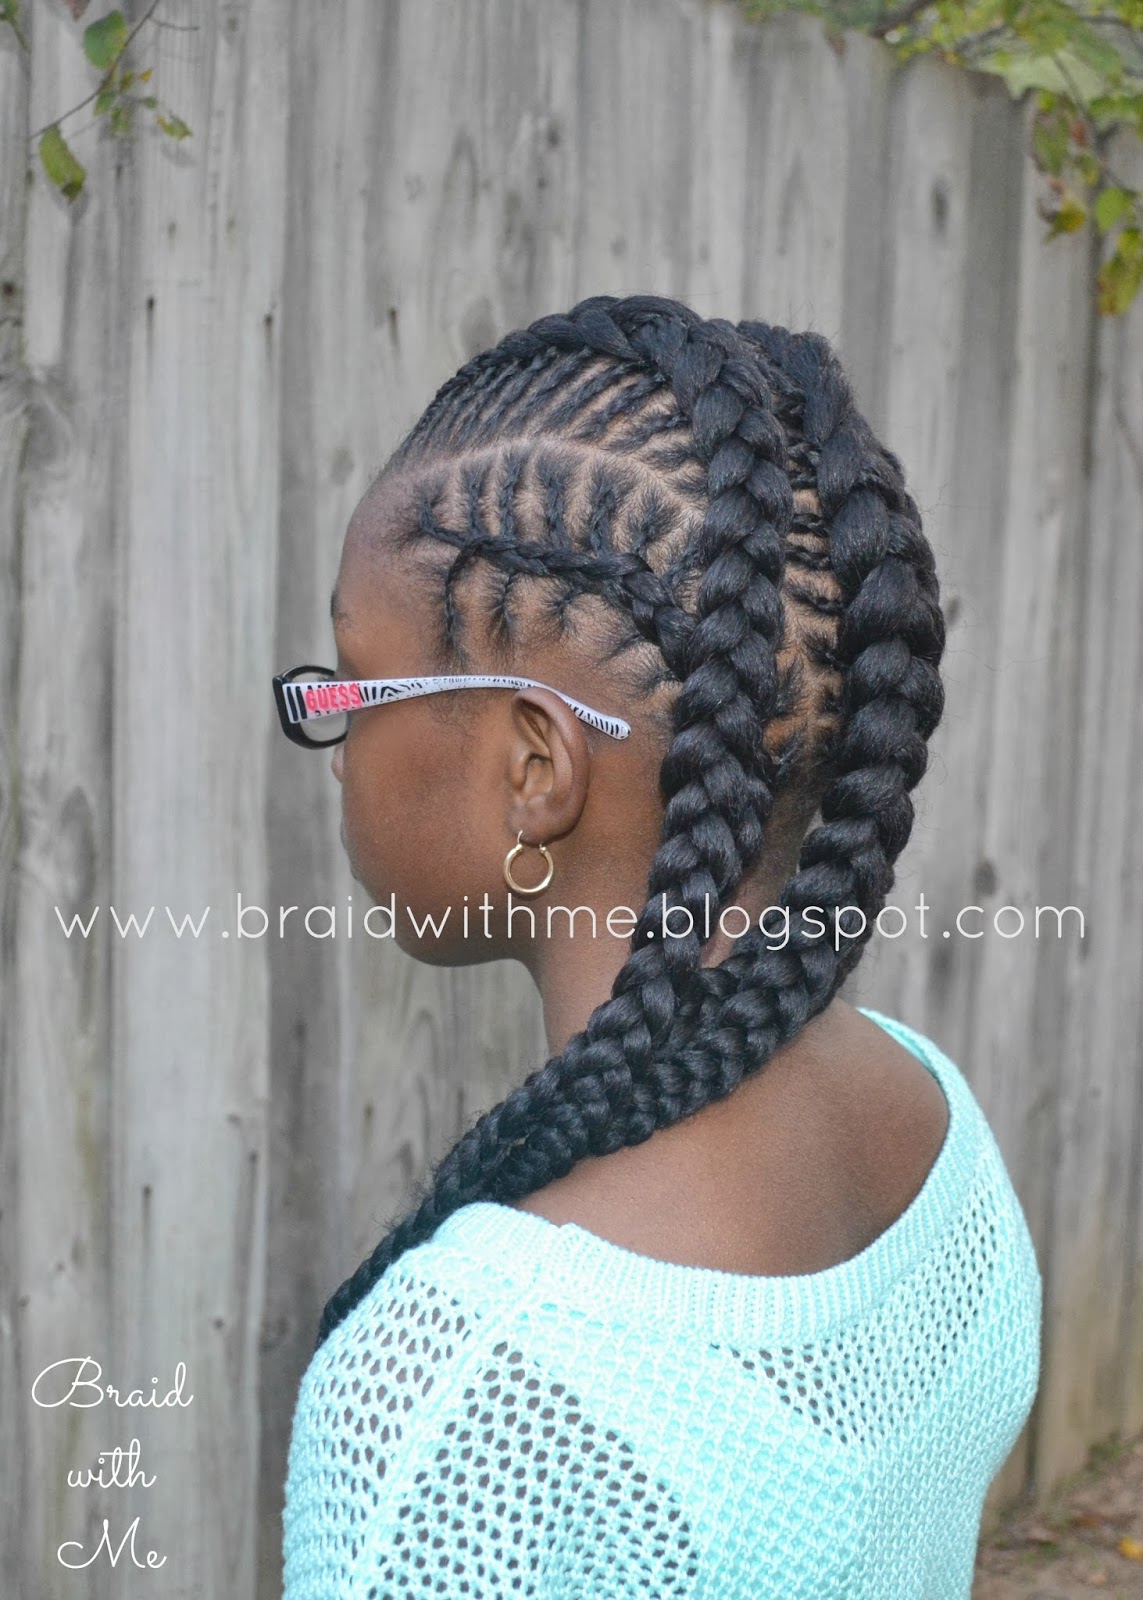
For this style, I started with hair that was previously styled in several two-strand twist ponytails. I sectioned her hair into four sections, two on each side of her head. Next, I began parting and braiding her hair in a fish bone style. 

Sections A and D were cornrowed straight to the back. I began cornrowing Section B but stopped at the midway point. I began Section C the same way as Section B and continued it with the remaining hair from Section B. This section is labeled as Section B2 in the following picture. The remaining hair from Section C was cornrowed separately to form Section C2. 


This style can be worn straight to the back or to the side. You also have the option to pin it up into a cute bun. 


Products Used


FAQs
How long did it take? I did not complete this style in one sitting. I began braiding and took several breaks. 

How long will this style last? This style should last for awhile with proper care. However, she has school pictures coming up soon so she will get a new style. 

What will you do to preserve this style? Anisa will protect her hair each night with a satin bonnet. I will also moisturize her hair with a water and olive oil mixture that I have in a spray bottle. I will also use the As I Am Leave-In Conditioner as needed. 


If you're not familiar with fish bone cornrows, check out this tutorial that we did when Anisa was only 6 years old. She is really growing up! It's sad, but I am blessed to be able to experience this with her.  


Let us know what you think about this style by leaving a comment below. Also, is there a style that you would like for me to recreate or try? Let us know. I'm always open to new ideas! 

Wednesday, November 27, 2013

Bee Mine Products Black Friday SALE!


Our FAVORITE hair products, Bee Mine Products is having a HUGE Black Friday Sale! The sale starts TOMORROW at 8pm EST. For 2 hours only, you can get 40% off (Whoa!) your purchase (minimum $30) using our reader discount code: TKSBBB If you have been wanting to try these products, now would be the time. I'm not sure if I ever remember them having up to 40% off. O_O


On Friday, November 29th you can receive 30% off ($25 minimum purchase) using the same discount code: TKSBBB 


Your best bet is to try to be one of the first orders tomorrow night!

As for product recommendations, everyone knows our go to products are Luscious Moisturizer and Curly Butter. Their new kiwi strawberry scent is to die for!

If you have any questions, let me know. Happy shopping!

Cornrows & Sister (Rope) Twists


As promised, we're back with another new hair style for your girls! This style works for all ages, even adults. Read below to see how we achieved this look.

Miss A's hair had already been stretched out from her previous hair style (large cornrows), as seen on our instagram, @beadsbraidsbeyond (follow us!) so there was no need for banding this time around. As many of you know, I almost always style on stretched hair. Click here to see how banding works and how it stretches natural hair in preparation for styling.

Alright, so now that the hair is already stretched, I applied a little Bee Mine Luscious Moisturizer to her hair and gently detangled with a Denman brush. Once her hair was completely detangled, I began cornrowing the top of her hair straight back for about an inch or two. I didn't want to braid too far back because I wanted the twists to hang to the side (as shown in pictures). If you're not able to cornrow, you can always flat twist, or check out our Cornrowing for Beginners post. I ended each cornrow with a rubberband (not too tight!) and began doing a sister (otherwise known as rope) twist with the remaining hair.

Sister/Rope twists are actually very simple. Split the section of hair into two pieces and begin twisting one clockwise and the other counter-clockwise. So, you're twisting each piece in opposite directions while twisting them around one another. It sounds complicated but try it right now with your own hair. Ready? Grab a small/medium section of hair, split it into two, now begin twisting one piece to the right and twist the other piece to the left, now begin twisting those two pieces around one another while maintaining the clockwise/counter-clockwise motion. Got it? Good! If all else fails, check out some Youtube tutorials. We will be making one of our own in the near future!

Now that the top is done, I moved on to the back. I began at the nape of her neck, parting a small square with my rat tail comb, adding a little Curls Control Paste and twisting, as explained above. I didn't use a rubberband at the base because her hair type holds these twists pretty well. If you're working with a finer texture of hair, you may need rubberbands. I continued parting small squares through-out the back of her hair and twisting until the style was complete.


A common question I'm asked is how I get the ends to stay without using a rubberband. Once again, this has a lot to do with her hair type but, once I reach the end of the twist, I begin rolling the ends between my thumb and index finger several times to ensure they stay put. You can also use a little holding product (such as Curls Control Paste) for a little extra help.

This style is easy to maintain and very versatile. These twists should last between 1 and 2 weeks. Check out our Youtube channel to see how we remove the sister/rope twists.

Instagram saw this style first... Follow us for the latest hair happenings! :) @beadsbraidsbeyond Let us know what you think of Miss A's new style and stay tuned for more blog posts!


Interested in trying out Bee Mine Products (our fav!)? Well, we have a reader discount code for you! Use code: FALLBBB only at www.beemineproducts.com to receive 10% off. Happy shopping!

Tuesday, November 26, 2013

Cornrows, Twists & Hearts... Oh My!


Quite the combination, eh? See, what had happened was... I began styling Miss A's hair with absolutely no plan in mind. I think the outcome was cute and age appropriate for young girls, wouldn't you say?

Never mind that. I'm pretty sure you're all wondering where we've been... yes? Well, let's just say life happened. Between Lil Man being diagnosed with autism, Miss A being diagnosed with epilepsy, becoming a full time working single mom and almost everything you can think of in-between, it's safe to safe my hands have been full... and not with my daughters hair, as you can imagine! Ha. If you're interested in reading more about our personal life, feel free to stop by my other blogs Facebook page, Nik Gets Fit, chronicling my life and weight loss journey.

Just here for the hair? Got it! Let's get straight to the point...

I washed, banded and moisturized Miss A's hair as usual. If you've been following us for a while then you have probably already checked out her hair care routine, if not, click here for all the details including the products I use for this process.


Once her hair was banded, I parted the top section of hair from ear to ear and tied off the back. I began parting near her right ear first to begin the first cornrow. New to cornrowing? No worries! Check out our Cornrowing for Beginners post, here.

Once I had a few cornrows on each side, I decided to part a heart right on top. I'm not sure why, it just seemed like a good idea at the time. As you can see, my parting skills are a little rusty, I haven't done a heart in quite some time. As for how I parted the heart, well, it's actually very simple. Take your metal rat tail comb, and "draw" a heart in your child's hair. You may have to do this a few times. Always perfect your "rough draft" if possible! Once you have a shape that somewhat resembles a heart (haha), place that section of hair in a ponytail.

Alright, so now we have the cornrows, we have the heart... now all that's missing are the twists! I wanted larger twists so I twisted the remaining hair from two cornrows together at a time. I parted squares with the remaining hair in the back, placed a rubberband at each base, and twisted.

After about 1 week of wearing this hair style, I removed the two strand twists, creating a gorgeous twist out for Miss A's birthday party! Check out the pictures below. Shout out to Miss Teeny Fab Couture for making Miss A's custom Monster High birthday party outfit!


Want to stay up to date with Miss A's latest hair styles? Follow us on Instagram! @beadsbraidsbeyond

Stay tuned for another hair style this week! Yes, we're baaaaack!

Tuesday, September 17, 2013

Instagram Mail! Fishtail Braid


Miss A's hair was recently straightened. I did a quick fishtail braid before bed. Stay up to date on her hair happenings by following us on instagram- @beadsbraidsbeyond

Also, stop by and "like" our Facebook page!

Looking forward to seeing you there!


Friday, August 16, 2013

Bee Mine Products Back to School Sale!


Our FAVORITE hair products is having a BACK TO SCHOOL SALE! Starting tomorrow, Friday, August 16th - August 18th. Receive 20% off your purchase using discount code: BTS13BBB only at www.beemineproducts.com

They are also introducing their new curly butter scent, Kiwi-Strawberry... I can't wait to try it!!!


Monday, July 22, 2013

Enter to WIN! Lily & Beads Hair Accessories!


Updated: CONGRATS TO CHIQUITA WARD!


Lily & Beads offers a variety of cute hair accessories and styling tools for your children at affordable prices! 

Lily & Beads has generously offered one of our readers a nice sized lot of hair accessories (see photo below). Entering is easy! All you have to do is "like" them on Facebook. Be sure to enter via Rafflecopter below. This giveaway runs from Monday, July 22nd - July 29th. Best of luck and big thanks to Lily & Beads for this awesome giveaway!

This giveaway is open to U.S. residents only.


Tuesday, June 25, 2013

A Natural Updo: Rolled , Twisted and Pinned

By Aisha of Braid with Me

We're back with yet another natural updo! I created this style with a mixture of cornrows and two-strand twists. 


 The Style


The Dashiki

This beautiful dashiki was made by Charmaine of Tambo Collection. Charmaine was very helpful and prompt in answering all of my questions about our order. Our items arrived on time and in excellent condition. 

The following description is found on her Etsy page: 

Welcome to our world of African fabrics by the yard, and unique handmade clothing. "Tambo Collection" is North America's largest supplier for Kente and wax print fabrics. We also sell fat quarters for small projects. We ship fast, and if our item is not in stock we will notify you by email immediately. See our selection of our handmade premade head wraps and crowns. **We also have a selection of hard to find African ribbon and trimmings**


The dashiki can be worn as a dress or as a top. We also had the option of wearing it with or without the sash. Anisa absolutely loves her dashiki and as you can tell from the pictures, it fits her perfectly! If you are interested in purchasing one, the direct link will be provided below. 


Mtoto Nubienne Earcuffs for Little Girls

Did you notice the gorgeous little jewels gracing Anisa's ears? They are Mtoto Nubienne Earcuffs that were handmade by Ayida Honor. I first became acquainted with her special gift of jewelry design on her Etsy page, Native Style Beadery. She has since launched her own page, which can be found here

Upon one look at her handmade creations it is obvious that these items were made with love. Although the earcuffs that Anisa has were made for little girls, they are very durable. 

Be sure to check out her page, www.ayidahonor.com, and fall in love with her gift of intricate beadweaving techniques. 


We would love to hear from you! Be sure to leave comment below! 


Saturday, March 30, 2013

Easter Updo for Little Girls with Natural Hair

Happy Easter! 
By Aisha of Braid with Me


Are you ready for Easter? We are!! Anisa will be sporting this gorgeous updo along with her oh-so-cute dress!! Here's how I achieved this look: 

Prep:
I detangled and washed Anisa's hair the night before I did this style. Once her hair was washed, I detangled her hair once again with my fingers and coconut oil  Her hair was also blow dried. Next, I loosely banded her hair for bed and tried to come up with a style for the next day. 

Styling:
I knew that I wanted to do an updo but I didn't want to do a style that I've done before. It has also been awhile since I've braided her hair so I also wanted to incorporate cornrows in her new style. 

To begin, I removed all of the bands and finger combed all of her hair to one side. Next, I began making curved parts from the nape of her neck to the top of her head to make the cornrows.  I continued cornrowing her hair until the section I was working with was complete. As you can see in the pictures below, I did not cornrow her entire head. 


I ended up with two sections, one with cornrows and one without. I made 3 two-strand twists in the cornrowed section and 2 two-strand twists in the loose section. 

Next, I began rolling the twists around my fingers to form large rosettes. The rosettes were then pinned into place. 


Products: 
Hair pins
Comb - for parting 

Easter Style: 
Of course Anisa has a gorgeous dress to go with her gorgeous new style! I found this Bonnie Jean watercolor floral dress online and I had to have it! As you can see, she loves it as well! 


Easter
How did you style your child's hair for Easter? We would love to see what you came up with!
Feel free to share your styles on our Facebook page!