
.jpg)
.JPG)

.jpg)
.jpg)


.jpg)
.jpg)
.jpg)
.jpg)
.jpg)
.jpg)


I will use the words braid/cornrow interchangeably.
Total Time: 3+ hours with breaks
Products used:
- Goody’s Ouchless bands
- Shea butter
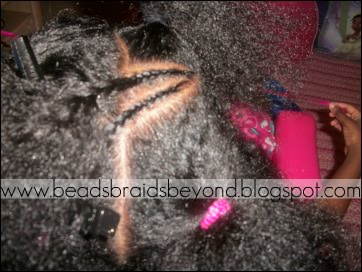
- Clips (I had to use these on certain sections)
- Combs (regular – for parting and a wide-tooth comb)
- Start with clean, detangled hair
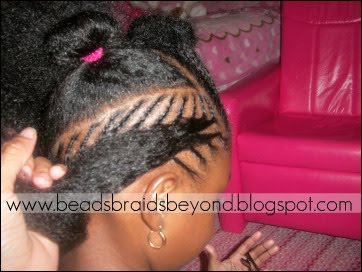
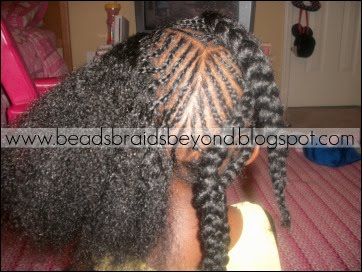
- I separated the hair into 5 sections. I secured each section with Goody’s Ouchless bands. There is one section on top, one section on each side and two more sections in the back.
- I began with the top section. I separated the top section into 2 separate sections and began braiding. I made small parts because I wanted small braids. The braids are going towards the part that I made in the middle of the top section. Oh I should add that I used shea butter while braiding her hair.
- When I finished that part of her hair I began on the other side of the top section. Once again the braids were going towards the part that I made in the middle of that section. I made sure to line the braids up with the other braids that I previously did. I ended up with 24 braids in all in the top section.
- I did not braid the hair together on top yet because I needed the hair out of the way. I secured the braids with an ouchless band until I was ready.
- I began to braid the side section. Once again I separated the section into 2 parts. I made the first conrnrow in that section in the middle (kind of at a point). The part that I made is behind this particular braid. I began braiding one side after I secured the other side with an ouchless band. I continued making small parts in her hair until I was done with that section. I did the same thing with the other part of that section.
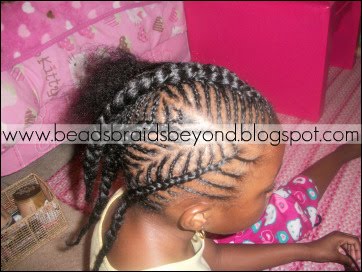
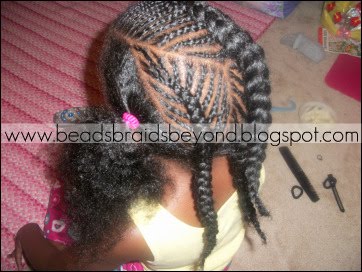
- While I was braiding her hair, I did not braid all the way down. I did braid too much of the hair in some sections so I had to undo them. I did not want the hair braided all the way down. I went back and made sure that the braids were loose so that I could cornrow the braids together.
- Next, I began on one of the back sections. I continued with the same steps (separating the hair into 2 section, securing one side, and braiding towards the part). I did the same on the other side until I was done. I undid any braids that needed it and I cornrowed the braids together.
- Now I was ready to cornrow the top section. Once again I undid any braids that needed it and cornrowed both sides together.
- I started the other back section and followed the same steps.
- I started my final section – the section on the side. I followed the same steps as previously stated until I was done.
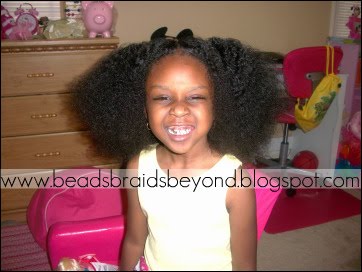
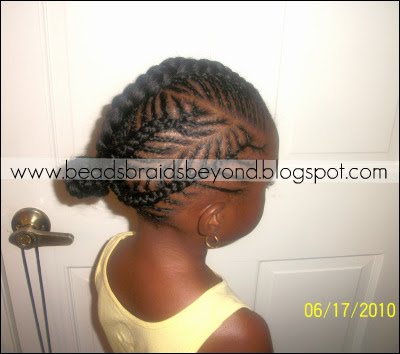
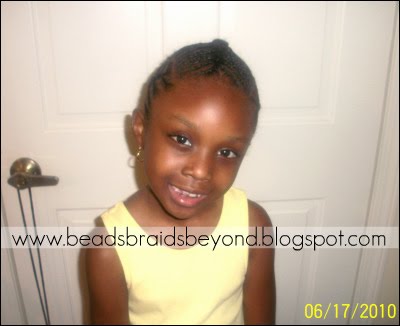
- I gathered each braid together and secured them with a black ouchless band. I wrapped the hair into a ball/bun and secured it with another black ouchless band.
- I added a pink flower to dress it up a bit.


.jpg)
That is as beautiful as it is impressive. Wow!
ReplyDeleteBeautiful!!! Will keep this in mind when my littles will sit longer to get their hair done
ReplyDeleteWow! That's amazing, and beautiful.
ReplyDeleteThanks! This is absolutely amazing! When my daughter has (a lot) more hair, we are definitely trying this!
ReplyDeleteVery intricate! Very nice, great job momma!
ReplyDeleteThats awasome!
ReplyDeleteBrianna
girlscurls.blogspot.com
i`ve been wondering how to do these! can`t wait to try them on myself & my little niece!
ReplyDeleteLove it!
ReplyDeleteWow! I'm impressed!!
ReplyDeleteThanks everyone!! If you plan to try this style (or a variation) or if you already have, I would love to see Hair Share pics!!
ReplyDeleteWe received the Bee Mine products shortly after I did this style and they worked great in keeping her hair moisturized.
Very nice hairstyle...however I won't even TRY to attempt this one lol!
ReplyDeleteGreat job, she is so pretty!
ReplyDeleteA little off topic, I couldn't help but notice her hello kitty bed sheets, if you don't mind me asking, where did you get them from?
@ Jazzy J - we found her sheets at Marshall's
ReplyDeleteLuv it,I can defd do this to Avi but I'm too lazy haha
ReplyDeleteI love that style even for myself!! You always do the cutest styles :)
ReplyDeleteI've always loved this look. How long does it usually take?
ReplyDeleteGreat job! That is so pretty!
ReplyDeleteOMG! So nice!
ReplyDeleteBeautiful! I have tried this once before ( a while back) and I had a problem with keeping the small braids from coming undone. Do you have any advice for this problem.
ReplyDeleteOOh Whee, that is a beautiful and very intricate hairstyle!! I think I'll try this on my lil angel but with bigger braids.
ReplyDeleteTootles!
Wonderful tutorial, please do more.
ReplyDeleteGorgeous! Very creative, and good for her, being able to sit for so long.
ReplyDeleteGreat job on your little ones hair u are very talented
ReplyDeleteHow long does this style last?
ReplyDeleteAisha, This is nice and I love the step by step pics. Do you blow dry her Anisa's hair? How long does this style last?
ReplyDelete@ Tata - No, Anisa's hair is not blow dried. After I wash her hair I will either plait it, put it in big cornrows, or band it in order for it to dry naturally. Her hair is styled the following day.
ReplyDeleteThis style could last for at least one week, maybe longer with proper care.
You go girl.Anisa's hair is too cute. I love doing these type of braids on my older sons hair because they can last long..it's just the time it takes to do them as well as the time it takes to take them down. I do like you and braid so far down for each braid. WE call these Iverson braids and I switch up the parts as well. Great Job Aisha, I love to see moms taking care of their daughters hair. I'm just mad because I have no little girls around me to do such pretty styles on and you as well as other moms on this board makes me want to start back doing only little girls hair.
ReplyDeleteNice aisha. I always tried but was not very successful at this style lol
ReplyDeleteThanks again everyone!
ReplyDelete@ my2gurlz - How short are you making the shorter braids? If you're not making then too short, you might want to secure the smaller braids with a clip until you're ready to add them to the bigger cornrow. I hope this helps!
I am going to try an alternate style this week. Thanks for answering my post Aisha.
ReplyDeleteI will try this this weekend, work, school, and 2 children will not allow me to do it tomorrow. It look great and how long did it take you? I will post a link to this page when I post them on my blog. Great job! and thanks 4 sharing Nikki.
ReplyDeleteI think I may need to braid the smaller braids further down until I do the bigger braid. I will also try the clip. Good advice, thank you!
ReplyDeleteAMAZING... you've got so much talent.. love this
ReplyDeleteLove it! I will be trying this next!
ReplyDelete@My2gurlz
ReplyDeleteThe clips will help, just make sure if you use the metals to be real careful they can snag and pull the hair if not propely handled. They also have plastic ones but if you get these make sure they have smooth edges because some have sharp edges that can do the same as the metal ones if not properly handled. i use them when i'm doing styles that deals with alot of parting (zig zag etc.)
I also like how this look works for a child or an adult....it's beautiful & intricate but not too 'grown'
ReplyDelete@ Letty - it took 3+ hours to finish her hair. I have a 7 month old so I had to take a bunch of breaks. I can't wait to see your results!!!
ReplyDelete@ my2gurlz - Aa Dimples stated, it is best to use plastic clips. You can kind of see the clips I used if you look at pic 6.
@ Dimples
ReplyDeleteThnx so much for the advice. I will keep that in mind when I go get some.
@ Aisha
ReplyDeleteThnx! I am so happy you did this style. I was just wondering last week how I could master it and then I saw your post, talk about perfect timing.
Great job, thanks for sharing!
ReplyDeletebeautiful !!!!!!!!!
ReplyDeleteYou always do such a beautiful job on her hair. I can't wait to try this style on my daughter's hair
ReplyDelete@ My2gurlz
ReplyDeleteNo problem, that's what we all as mothers are here for ...to help each other out. I myself have learned alot of things this year alone from other mothers on this board as well. I was looking for natural products for my family after hearing about the terrible ingredients in the products as well as cowashing, which I have noticed a big difference with my childrens hair.
Yeah that's really nice
ReplyDeleteBEAUTIFUL:)
ReplyDeleteSo very pretty! I'm your 1000 follower! Happy to be here! Eve
ReplyDelete