Showing posts with label sister twists. Show all posts

Wednesday, November 27, 2013

Cornrows & Sister (Rope) Twists


As promised, we're back with another new hair style for your girls! This style works for all ages, even adults. Read below to see how we achieved this look.

Miss A's hair had already been stretched out from her previous hair style (large cornrows), as seen on our instagram, @beadsbraidsbeyond (follow us!) so there was no need for banding this time around. As many of you know, I almost always style on stretched hair. Click here to see how banding works and how it stretches natural hair in preparation for styling.

Alright, so now that the hair is already stretched, I applied a little Bee Mine Luscious Moisturizer to her hair and gently detangled with a Denman brush. Once her hair was completely detangled, I began cornrowing the top of her hair straight back for about an inch or two. I didn't want to braid too far back because I wanted the twists to hang to the side (as shown in pictures). If you're not able to cornrow, you can always flat twist, or check out our Cornrowing for Beginners post. I ended each cornrow with a rubberband (not too tight!) and began doing a sister (otherwise known as rope) twist with the remaining hair.

Sister/Rope twists are actually very simple. Split the section of hair into two pieces and begin twisting one clockwise and the other counter-clockwise. So, you're twisting each piece in opposite directions while twisting them around one another. It sounds complicated but try it right now with your own hair. Ready? Grab a small/medium section of hair, split it into two, now begin twisting one piece to the right and twist the other piece to the left, now begin twisting those two pieces around one another while maintaining the clockwise/counter-clockwise motion. Got it? Good! If all else fails, check out some Youtube tutorials. We will be making one of our own in the near future!

Now that the top is done, I moved on to the back. I began at the nape of her neck, parting a small square with my rat tail comb, adding a little Curls Control Paste and twisting, as explained above. I didn't use a rubberband at the base because her hair type holds these twists pretty well. If you're working with a finer texture of hair, you may need rubberbands. I continued parting small squares through-out the back of her hair and twisting until the style was complete.


A common question I'm asked is how I get the ends to stay without using a rubberband. Once again, this has a lot to do with her hair type but, once I reach the end of the twist, I begin rolling the ends between my thumb and index finger several times to ensure they stay put. You can also use a little holding product (such as Curls Control Paste) for a little extra help.

This style is easy to maintain and very versatile. These twists should last between 1 and 2 weeks. Check out our Youtube channel to see how we remove the sister/rope twists.

Instagram saw this style first... Follow us for the latest hair happenings! :) @beadsbraidsbeyond Let us know what you think of Miss A's new style and stay tuned for more blog posts!


Interested in trying out Bee Mine Products (our fav!)? Well, we have a reader discount code for you! Use code: FALLBBB only at www.beemineproducts.com to receive 10% off. Happy shopping!

Thursday, September 29, 2011

Cornrows & Sister/Rope Twists Braided to the Side


This is the style I did on A's banded hair. I did this over the course of 3 days because I started during the school week and we didn't want to sit for long periods of time. I absolutely love the look of sister/rope twists! I actually tried to make a video tutorial but for some reason the tripod would not stay straight up, it kept falling down so I gave up after 3 tries. I will have to figure it out because I really want to post more tutorials.

Instructions:
  • Again, I started on stretched hair from banding. If you are not familiar with banding, please check out our banding frequently asked questions post.
  • I began by parting a section near her left ear for the first cornrow. If you do not know how to cornrow, please check out our cornrowing for beginners post.
  • I continued cornrowing three sections near her left ear, then I moved on to the other side at her hairline. I cornrowed three sections on that side then went back to the other side. No reason in particular, this is just how I like to do it. You can certainly stay on one side until you reach the other side.
  • At the end of each cornrow I took the three sections and made them into just two sections by borrowing hair from the middle section and adding it into the right and left section. 
  • After I had two sections of hair I began doing a sister twist, otherwise known as rope twist. This is not a regular two strand twist. You simply begin twisting one section clockwise and the other section counter clockwise as you twist all the way down. Continue this twisting motion (twist one section to the right and one to the left) until you reach the ends. Please check out this sister twist video tutorial. Once you get to the end of the twist, roll the ends between your index and thumb several times to make sure the twist stays.
  • After I cornrowed and twisted the top, I parted the hair horizontally at the nape of the neck and tied the rest of the hair off to get it out of my way. I parted small squares using the end of our metal rat tail comb and began doing the sister/rope twist. I did this to all of the remaining hair until I was finished.
  • To make this style look less basic and a little more creative, I gathered the twists coming from the cornrows and started cornrowing the twists all the way to the left side near her ear and tied the cornrow off with a black ouchless band.
  • I used Bee Mine Curly Butter (BBBHOT will get you 10% off your purchase) and unrefined coconut oil for this style.
  • Please note, I prefer doing the sister/rope twists on dry, stretched hair because it shows length a lot more. I find that when I do this style on wet or damp hair the twists curl up a lot more, don't hold as well and tend to be more frizzy.


Saturday, February 19, 2011

Sister Twist Out


I took A's sister twist style out and these were the results. I love sister twists outs. They almost appear to be curled locs. Since she had beads on the ends, her ends are still pretty straight, if that bothers you I'd recommend rolling the ends on flexi rods or perm rods for a little while for them to curl up.

Click here for the sister twist video tutorial.


Guess who lost another tooth?

Thursday, February 17, 2011

Sister Twists & Cornrows with A Splash of Color


The weather has been lovely so I really wanted to do a fun and bright style in A's hair. Read below for instructions.


Instructions:
  • I washed and detangled A's hair the night before. After washing and detangling, I moisturized her hair and placed it into 10 medium sized braids, 5 on each side of her hair.
  • I let her wear those braids to school the next day so when she got home her hair was moisturized and stretched out, ready for styling.
  • I began by parting her hair from ear to ear. After I had my top section parted I tied the back section off.
  • I started near her right ear. I just parted straight back, making a square and tied it off with a colorful rubberband. I didn't have any virgin coconut oil near by so I just quickly dipped the rubberbands in Bee Mine Luscious Moisturizer and made sure I added a little extra moisturier to the sections I was banding. After placing a rubberband on this small section, I did a sister twists. To create a sister (or rope) twist you just split the hair into two and start twisting one section clockwise and the other counter clockwise, then you start twisting around one another all the way to the ends. Once I got to the end of the twist I added some beads with our beader.
  • After doing the first section I cornrowed one section back, banded it at the end of the cornrow, then did a sister twist.
  • I then split a larger section on the top, about enough for two cornrows. Instead of cornrowing, I decided to split that large section into two and make 3 small squares in each of those sections. I banded them at the base, then pulled them over to the section on the other side, banded, and repeated. I did the same thing on the other side.
  • I added yet another cornrow and continued this pattern until the top was completely finished.
  • I untied the back of her hair and started at the nape of the neck. I parted three sections in the back, banded at the base, then twisted and added beads. I continued parting squares in the back and twisting until the back was finished.
  • This process took about 2 1/2 hours

Note: I don't like leaving rubberbands in for too long, especially not around her edges so I will keep the rubberbands in the front in for about a day or two then back them out and probably just cornrow those banded together sections.

As you know, I love to switch up styles. You can see a couple of options below.


Monday, January 17, 2011

Cornrows, Twists & Beads


Instructions:
  • As always, start with (properly) detangled hair. :)
  • I first parted her hair from ear to ear and tied the back section off. I moved back to the top section and parted a square in the middle. I tied off the section on each side of the square and got started.
  • I began parting hair out of the square to cornrow. I started in the front and stopped at the end of the cornrow, leaving the rest of the hair free. I moved on and cornrowed another section. I now had 2 sections cornrowed, I took those two sections and tied them together with a white rubberband (previously soaked in coconut oil). After tying them together I began twisting them. I did sister twists, otherwise known as rope twists. To create a sister twist, you just turn one section of hair clockwise and the other counter clockwise, then you begin twisting them around one another, continuing to twist them in opposite directions. I rolled the ends of the twists in my fingers and proceeded to add beads with a beader. I tied the ends with a black rubberband (soaked in coconut oil) and moved on to my next section. She had a total of 6 cornrows in the middle square, all tied together to create one twist, so she had 3 twists.
  • After finishing up the middle section, I moved on to the right side of her hair. I cornrowed 4 braids straight back and tied every 2 cornrows together to create the twist, just like in the middle section. I repeated this process on the left side.
  • After cornrowing, twisting and beading the top half of her hair, I moved to the back. I started at the nap of her neck and began parting large squares, I tied them off with white rubberbands and twisted them up, using them same sister twist method. I did this to the back of her entire head.

Note: This style took 1-1.5 hours and lasted just over 1 week. I used the usual, Bee Mine Luscious Moisturizer and Curly Butter.


"The quality, not the longevity, of one's life is what is important." — Martin Luther King Jr.

Thursday, October 28, 2010

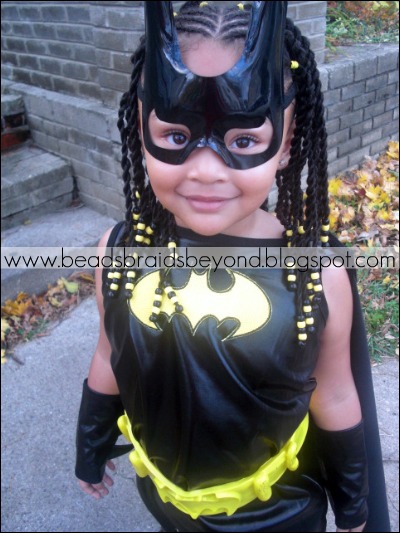
Cornrows and Sister Twists - Bat Girl Style


I'm a little late posting this, we've been so busy! This was the style I did last Halloween when she was Bat Girl. This style fits any occassion and the colorful elastics add a lot of flare. :)

Photobucket


Instructions:
  • Start with completely properly detangled, well moisturized hair. I can't stress this enough. :)
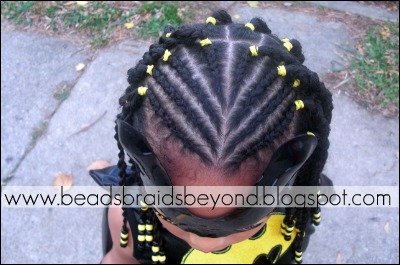
  • Begin by parting a square in the front middle section on the hair. Once you have this square parted off, start from the nape (back of the neck) and part a small/medium square. Tie this off with your choice of rubberband/elastics, split the section into two equal pieces, and begin doing a sister twist (otherwise known as rope twist). If you're unfamiliar with these twists, you simply twist one strand clockwise and the other counter clockwise, and begin twisting each strand around one another, continuing this motion all the way down.
  • Using your beader, add your beads to the twist and tie the ends off with a rubberband/elastic or a hair snap so the beads stay in place.
  • Continue parting your squares, tying them off, twisting and adding beads.
  • Once that is done, untie your top section, part is straight down the middle and begin parting at a slant with the hair closest to the right (or left) ear. Once you cornrow that section, tie the end of the cornrow off with a rubberband/elastic then begin your sister twist.
  • Continue parting at a slant and cornrowing until your right or left section is complete and move on to the other side.

Note: I believe this style took 1 1/2 hours. I know I used unrefined shea butter mixed with virin coconut oil, and I believe a little ORS lock and twist gel, but it's been so long so I'm not certain on the ORS. ;)

Photobucket

Photobucket

Happy Halloween!
Photobucket

Monday, August 23, 2010

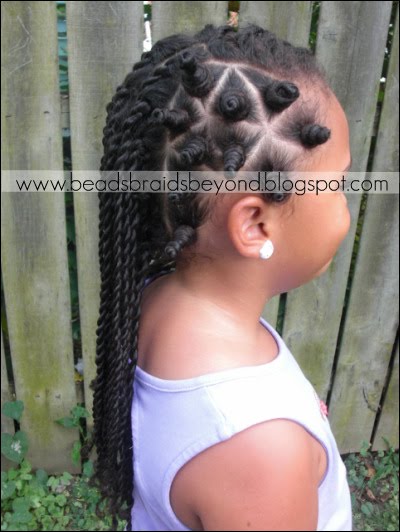
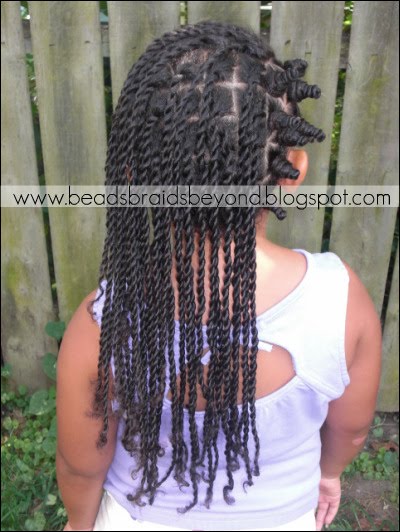
Sister Twists with Bantu Knots On The Side

Photobucket

Photobucket


Instructions:
  • As always, start with clean, well moisturized, properly detangled hair.
  • I banded A's hair the night before, so the next day it was slightly stretched out.
  • I began sectioning off the hair on the side so I could make the bantu knots. I tied off the left side of her hair to get it out of my way and started making the bantu knots. I tried parting medium sized triangles. To make the bantu knot I just took the small/medium section of hair and twisted the entire section around, as if I were making a finger coil, I then started twisting the hair all around near her scalp. As you twist, you want to twist the section of hair under the bantu knot. So when I finally got to the end of the bantu knot, I twisted that section under the entire bantu knot so it would stay in place. I hope that makes sense.
  • After I was done with the bantu knots, I began on her sister twists (or rope twists). I untied the left section of hair, and parted small/medium squares starting at the nape of her neck. At this point, you probably know how to do the sister twists but for those of you who do not, you simply section off some hair, split it into two sections, then you begin twisting one entire section clockwise, and the other section counter clockwise, you will then start twisting each section around one another while you continue to twist each section clockwise and the other counter clockwise.
  • I twisted the entire left section and she was all done!

Tools Used:
  • Metal rat tail comb
  • Modified Denman D3 Brush
  • Bee Mine Products (specifically Luscious Moisturizer & Curly Butter)
  • Ponytail holder to tie off left section

Total Styling Time: 2 hours

Photobucket

Photobucket

Saturday, May 1, 2010

Sister Twists: One Year Later

I think most of you know that I learned how to properly care for A's hair just over one year ago (January 2009 is when I started doing research and such). Even then, I wasn't doing everything correctly. No one is perfect.

I shared some pictures of A's sister twists then and now in a couple of my favorite forums, I didn't plan on posting them- but I feel so proud that I really wanted to share the pictures with you all. Her hair is so healthy now, and well, you can't really ignore the significant amount of growth she has had in about 14 months.

First sister twists: February 17th, 2009

Photobucket

Sister twists now: April 28th, 2010

Photobucket

It's crazy what simple proper hair care methods/techniques can do in such a short amount of time.

Have you noticed any changes in your childs hair lately?

Thursday, April 29, 2010

Side Cornrows into Sister Twists

Photobucket
Inspired by: Jill Scott and Tia of Her Best Hair


Get the look:
  • Using the end of a metail rat tail comb, part about half of the hair, tie the other half off and start cornrowing that side. You can do whatever design you would like. I used Bee Mine Luscious Moisturizer and Curly Butter on each cornrow. I made the cornrows very loose for the protective styling challenge. If you do not know how to cornrow, please visit this website: Cornrows.co.uk This is the website that taught me how to cornrow.
  • Once you get to the end of your cornrow, add a little more product to the remaining hair, add the hair together so instead of 3 sections you will have two. Start twisting one section clockwise, and the other counter clockwise. This is the two strand sister twist method. Keep twisting the pieces in different directions while twisting around each other.
  • Once that side is all complete with cornrows going into sister twists, start parting medium sized boxes, add product, and do the sister twist method. You want your thumbs and pointer fingers holding on to each section close to the scalp. Your twist is going to unravel some, so you want to twist it close to the scalp, however, you don't want to tug on the scalp. Once you get to the end of each twist, you can start doing a regular two strand twist, then roll the ends with your fingers.
  • You will do this to the entire head of hair until you are finished.
Tip:This took me about 3 hours so make sure you take a break and have toys, snacks, and books on hand for your little one. Talk to your child during this time, have fun, be silly! Sprout and Noggin are great channels for the little ones.


She insisted I take pictures of her wearing her sunglasses.
Photobucket


Maintaining this style
  • Moisturize each night with your product of choice
  • Cover hair each night with a satin bonnet, or have your child sleep on a satin pillowcase

View more pictures of this style here.

Product Review: Bee Mine Curly Butter, Luscious Moisturizer, & Spirtz

Bee Mine

Photobucket

Luscious Balanced Cream Moisturizer

The Claim: Our moisturizer is enriched with pro-vitamins, natural proteins and healing butters that heal seal and nourish your hair and scalp. Beautiful hair requires a complete balance of moisture and protein to prevent breakage. This light cream moisturizer help to prevent split ends and strengthen hair from root to tip.

Price: $18 8oz

Ingredients: Distilled water, Hydrogenated Persea gratissima (Avocado) Seed Oil, Mangifera Indica (Mango) Seed Butter, Cocos Nucifera (Coconut) Oil (and) Aloe Barbadensis Leaf Extract, Butyrospermum Parkii (Shea Butter), Persea gratissima (Avocado) Oil, Simmondsia Chinensis (Jojoba) Seed Oil, Emulsifying wax, Hydrolyzed Wheat Protein, Vitamin E Tocopherol Oil & Fragrance (Island Mango).

Review: I applied a little Luscious Balanced Cream Moisturizer to A's dry, detangled hair. This product had a nice, light scent It was very fluffy, it reminded me of whipped cream. It went in A's hair so smoothly, and left her hair soft and moisturized.


Bee Hold Curly Butter

The Claim: This shea butter and aloe based curly butter is packed with rich moisturizing nutrients to give you long lasting moisture and promote growth. It has a soft touchable hold that will help to defrizz your frizzes and give great definition. This Curly Butter is wonderful for twists, finger curls, puffs/pony tails and especially for laying down unruly hair. Great for naturals, relaxed, texlaxed, everyone.

Price: $12.97 8oz

Ingredients: 100% Shea Butter, 100% Aloe Vera Gel, Essential Oil Blend, Vegetable Glycerin, Rosemary Leaf and Chammomile Extract, Silk Powder and Perfume

Review: After sectioning off about half of A's hair, I started to do small, loose cornrows on one side. I applied a little more Luscious Balanced Cream Moisturizer to each section, then I applied Bee Hold Curly Butter to each section. The combination of the two was so lovely! The Bee Hold Curly Butter clumped the three strands of hair I was cornrowing together, so it made the cornrowing process very easy. My fingers slid down each section very easily. Her hair was well moisturized, and while I made the cornrows loose for our protective styling challenge, they still had great hold. When I got to the end of each cornrow I started doing the two strand sister twist method. This is when you twist one section clockwise, and the other counter clockwise, then you start twisting around one another. Her twists felt amazing and looked amazing! This product was nice and creamy, a thick consistency, but not too thick. The Curly Butter smelled like baby powder, A liked the smell, it was nice. Scents available: Coconut Cream, Unscented, Island Mango (Tropical Mango)

Juicy Moisturizing Daily Spritz

The Claim: Bee Mine Juicy - Moisturizing Daily Spritz is an excellent moisturizer for natural & relaxed hair. It is loaded with organic aloe vera juice, ayurvedic herbs and nourishing essential oils to stimulate the scalp and strengthen your tresses. Use daily as a mid day refresher bedtime moisturizing treatment.

Price: $12.97 8oz

Ingredients: Organic Aloe Vera Juice, Herbal Infused Purified Water, Organic Coconut Oil, Organic Extra Virgin Olive Oil, Pure Glycerin, Ayurvedic Herbs, Select Herbs, Polysorbate 20, Essential oils of Tea Tree, Peppermint & Grapefruit, Vitamin E Tocopherol Oil, Fragrance, Paraben & Formaldehyde Free Preservative.

Review: Love Juicy Moisturizing Daily Spritz! I sprayed her hair with this after her style was complete, it added shine, and moisturized her hair even more. The smell (Island Mango) is amazing! I love the smell so much that I put off washing my hands for a little while because they smelled so nice, lol. Don't judge me! :P

Photobucket

Do you SEE the shine?! Love it!

Photobucket

This combination together is just amazing! If you're a Facebook friend then you saw my status, and I quote, "Bee Mine, where have you been all my life?!" I have not yet met a product that works so well on her hair style. Her cornrows and twist have great hold, they are super moisturized and soft, her hair smells great, what more could I ask for? This was another one of those times where I liked the product so much, that I immediately went on Facebook and in the CurlyNikki forum to post about it. I really think I have found the perfect twisting product. I would love to see how the Curly Butter works on defining her curls, because like I said, when I was cornrowing the product was really clumping the sections together for me.

If you would like to purchase Bee Mine products, check out their website! They also sell samples.

Photobucket

Disclosure: The product(s) were sent to me free of charge from the company or PR agency for the purpose of this review. My opinions are my own and are not influenced by any other part.