Showing posts with label bantu knots. Show all posts

Thursday, November 1, 2012

Introducing New Guest Blogger: Carrie Fay


By: Carrie Fay of Amaro Baby

I never in a million years thought that "cornrow" would be a regular part of my vocabulary.  Seriously.  Let alone flat twist... beads... bantu knots or the hundreds of other words that float around our house.  

But then Violet joined our family and my world was turned upside down in a thousand perfect ways, not the least of which is caring for her amazing hair.     


With practically no hair on her head the day she turned 11 months (also they day we met!) she and I have learned this process together, step by step.  Slowly, steadily, and to both of our great delights.  Now we eagerly anticipate hair days.  We collaborate on styles, colors, and the movies to include in our movie marathons.  (Hair days are fun for lots of reasons, people!)   


I get a little too excited talking about hair, can you tell?  So excited that I forget to write about what I'm SUPPOSED to write about:  A little about myself.  I am a proud mama to Violet (3 years old) and Daniel (5 years old).  I am a wife to the most ridiculously amazing husband out there.  I have experienced motherhood through adoption and through pregnancy.  I am a photographer and am relentless in my attempts to stop time (or at least slow it down!) through photography.  I am totally in love with Jesus.  Also, ice-cream.  I am a part of a family where no one matches - four skin tones, four hair types, four different stories - and we love it.  I began homeschooling our two kiddos a few months ago and am daily floored by the experience - it's beyond my wildest expectations.   


I am beyond thrilled to guest post on one of my all time favorite hair blogs.  Violet and I owe so much to the online community of natural hair care supporters/educators and it's my hope that I can encourage the mamas out there who are just starting out, just reaching out for information about natural hair.  You CAN do this!  One cornrow at a time.  


Now, if you'll excuse me.  Hair day is tomorrow and Miss Violet is in the next room, trying to decide on bead colors for her yarn twists.  It might not be the most important decision we'll make all week, but I wouldn't miss it for the world.  

New Blog:  In the works!
Old (Outdated!) Blog:  www.amarobaby.blogspot.com 

Tuesday, July 10, 2012

Bantu Knot-out


I recently posted a picture of a gorgeous bantu knot-out done on shorter natural hair on our Facebook page.  I haven't done a full bantu knot-out on Miss A since she was about 4 years old and it didn't go very well but I felt inspired to try it again and although we had some issues this time as well I still love the look and she does too! 

Bantu Knot Instructions:

1. I began by working on freshly washed hair. For her full routine, click here.

 2. Using a wide tooth comb, I parted a medium to large size section by her forehead. I added a small amount of Bee Mine Luscious Moisturizer to her wet/damp hair then added a little Bee Mine Curly Butter from root to tip.

3. I began to twist the entire section to the right, all the way down to the ends.

4. Once the entire section was twisted, I started to twist the section into a circle near her scalp. Each time I twisted the section around, I tucked it under the previous one. I tucked her ends under the entire bantu-knot. Please be careful not to twist the section too tightly. I actually hold on to the knot and twist the entire bantu-knot the opposite way just to make sure it's not tugging on her scalp.

 5. There you have it! A bantu knot! Continue parting with a comb and twisting until you're done.

Bantu knots complete!

 The back view.

I gently removed the bantu knots after a few hours. Here's the end result of her bantu knot-out:


I like the results but it didn't come out as I expected. Next time I will work with dry, moisturized, stretched hair (from banding). You can see some of the parts in the back began to frizz up, this is because they were still wet. I will also use less product next time. I'm going to try another bantu-knot out on her within the next month to stay tuned!

Now it's YOUR turn! I'd love to see your bantu knot-out's! If you have pictures, feel free to post them on our Facebook wall. I'd love to see them!

Let me know what you all think of the new look. I changed a few things. Hopefully it's easier to find what you're looking for. I'm still working on it and I'm totally open to suggestions. Also let me know how you like the picture tutorial. Was it helpful or can you do without? 

 Don't forget to like us on Facebook!

Saturday, May 7, 2011

Flat Twist/Bantu Knot Out Inspired By Naptural85


I've had Naptural85's How To Bantu Knot Out video favorited on Youtube for quite some time now. I decided to try the style last night at the last minute. I styled on wet hair and only used Bee Mine Luscious Moisturizer (by the way, they are having a Mother's Day Sale tomorrow! Use code: BBBMOM for 15% off your purchase). I parted in random sections and detangled with my fingers and a comb. The entire process took maybe 30-40 minutes. The next morning I removed her satin bonnet and took the bantu knots out. Her hair, especially the back, was still quite damp but I went ahead and took the twists out anyway. Next time I will work on slightly damp hair because bantu knots take entirely too long to try. If I had waited for her hair to completely dry I think it would be less frizzy in the back. I still loved the results though, she loves it, too!

Check out the video from Naptural85. Her hair is gorgeous!


Tuesday, April 26, 2011

Cornrows, Bantu Knots & A Bantu Knot Out


After a few days of wearing the cornrowed ponytails style, I decided to do Bantu Knots. I really love how they turned out.


I released the Bantu knots this morning for this look. I sent the other pics last night. These pics might be a little dark because I took them with my phone.


Submitted by our guest blogger, Aisha.

Monday, August 23, 2010

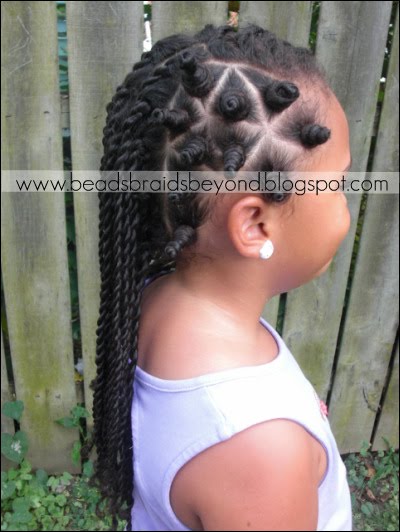
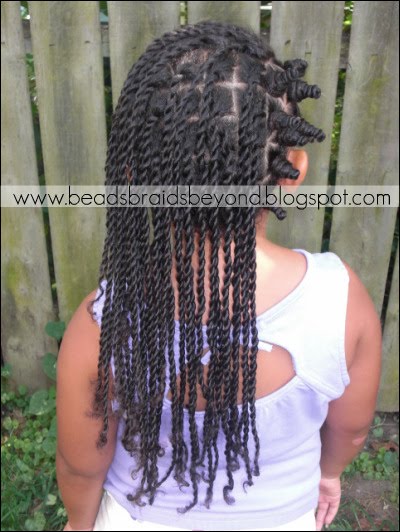
Sister Twists with Bantu Knots On The Side

Photobucket

Photobucket


Instructions:
  • As always, start with clean, well moisturized, properly detangled hair.
  • I banded A's hair the night before, so the next day it was slightly stretched out.
  • I began sectioning off the hair on the side so I could make the bantu knots. I tied off the left side of her hair to get it out of my way and started making the bantu knots. I tried parting medium sized triangles. To make the bantu knot I just took the small/medium section of hair and twisted the entire section around, as if I were making a finger coil, I then started twisting the hair all around near her scalp. As you twist, you want to twist the section of hair under the bantu knot. So when I finally got to the end of the bantu knot, I twisted that section under the entire bantu knot so it would stay in place. I hope that makes sense.
  • After I was done with the bantu knots, I began on her sister twists (or rope twists). I untied the left section of hair, and parted small/medium squares starting at the nape of her neck. At this point, you probably know how to do the sister twists but for those of you who do not, you simply section off some hair, split it into two sections, then you begin twisting one entire section clockwise, and the other section counter clockwise, you will then start twisting each section around one another while you continue to twist each section clockwise and the other counter clockwise.
  • I twisted the entire left section and she was all done!

Tools Used:
  • Metal rat tail comb
  • Modified Denman D3 Brush
  • Bee Mine Products (specifically Luscious Moisturizer & Curly Butter)
  • Ponytail holder to tie off left section

Total Styling Time: 2 hours

Photobucket

Photobucket

Friday, June 25, 2010

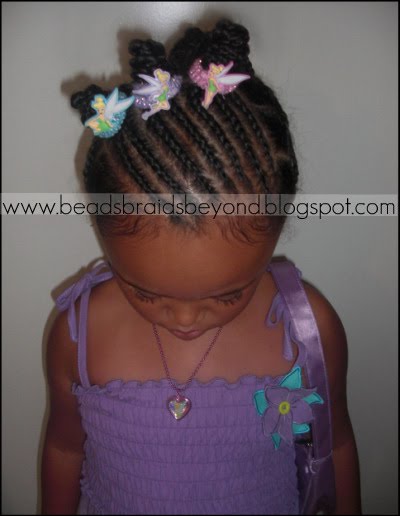
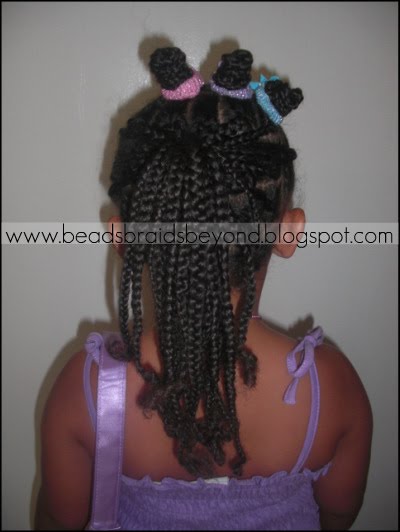
Bantu Knots and Box Braids

Photobucket

Let me start by saying A is not a fan of bantu knots all over. When I first did bantu knots all over her head last Summer she wanted me to take them out because she thought she looked like a "dinosaur with horns" and kept calling the bantu knots horns all day (kids...). That's unfortunate because I think bantu knots look adorable on little girls.

I decided to switch up her Slanted Cornrows and Natural Box Braids style a couple of days later. First I added some Bee Mine Beeloved Hair & Scalp Moisturizer to her hair then all I did was make bantu knots out of the braids hanging down from her cornrows. With the 7 braids I made three bantu knots and tied them off with some cute Tinkerbell ponytail holders, I put her box braids in one ponytail. She had the whole Tinkerbell get up (dress, sandals, jewlery, purse) so it looked really cute! She LOVED it! I'm happy to know now that I can do a few bantu knots here and there in her styles without her thinking she looks like a dinosaur, lol. Making a bantu knot is really simple, you just take the desired amount of hair (or braids/twists) and start twisting the entire section around placing it near the scalp, the ends will wrap around/under the bantu knot. A ponytail holder is not necessary but it will provide better hold.

Photobucket

Photobucket

Today is the LAST day to enter the Sidewinder Hair Holders Giveaway! There will be our winners.

You have another week to enter the Blended Cutie Giveaway! One follower will win their choice of 3 full size Blended Cutie products.