Thursday, June 18, 2015

Bee Mine Products PRE-SUMMER SALE!

It's no secret that our favorite hair care products is Bee Mine. They just launched their pre-summer sale, receive 20% off your purchase using code: JUNEBBB


We've been using their products for years. If your child's hair seems to have a hard time staying moisturized or just soaks everything up I highly recommend you at least try their Luscious Moisturizer. Swear by this stuff!

Tuesday, January 20, 2015

Dove Hair: Love Your Curls

Check out this adorable Dove commercial.

"Did you know that only 4 out of 10 curly haired girls think their hair is ‘beautiful’? The best way to inspire them to love their curls is to celebrate and show them how much you love yours. Girls are 7 times more likely to love their curls if people around them do."

Sunday, January 18, 2015

6 Tips for Healthy Natural Hair Growth (Part Three!)


In our final post of this three-part-series we are going to discuss proper detangling and the use of excessive heat. If you missed the previous tips, you can check out part one here, and part two here. 

Tip #5: Proper Detangling

Proper detangling is crucial when it comes to retaining length. The best thing you can do for your child’s hair is to finger detangle before a comb or brush ever reaches those curly tresses. After washing your child’s hair, you will add your conditioner of choice (hopefully one with lots of slip!). You will begin with small sections by gently running your fingers through your child’s hair, feeling for any small knots. Gently remove them. Once you are finished finger detangling one section, you can use your wide tooth comb or Denman brush. Be sure to always start from the ends, working your way up until that section is completely detangled. Braid or twist the section and move on to the next. Never comb or brush your child’s dry hair unless it has already been completely detangled and stretched (see banding), be sure to use a moisturizer.


Tip #6: Avoid Heat

You’d be surprised at how often people are using heat on their child’s hair. Many parents and caregivers tell me they like to blow dry their child’s hair before styling. Not only does heat weaken the hair shaft, especially if proper heat protectant is not being used, but there’s a big risk with permanently damaging your child’s curl pattern. Once this is done, the damage cannot be reversed unless the heat damaged hair is cut off.  Blowdrying before styling is an unnecessary step that can easily be achieved by banding. Banding is a way to stretch the hair without the use of heat. If you must use heat, make sure you go about it the right way. Check out this post and this post for flat ironing tips.

I hope you have enjoyed this three-part series on how you can help your child grow long, healthy natural hair. While there’s nothing wrong with wanting long, Rapunzel-like hair, try not to put too much emphasis on length as it could create a complex in your little one’s mind. Be mindful of what your child wants and talk to your child about healthy hair care habits. It’s never too early to learn about caring for those beautiful locks, no matter what the length.

You can read all about Miss A's hair care routine by clicking here. 

Let's Connect! | Facebook | Instagram | Pinterest | 

Saturday, January 3, 2015

6 tips for Healthy Natural Hair Growth (Part Two!)


Yesterday we talked about two important tips to get your child started on their healthy natural hair journey. Today, we are going to discuss the importance of protective styling and how it will help retain length.


Tip #3: Avoid Wearing the Hair Out/Loose

If your goal is long hair, I highly advise you to save loose styles for special occasions. This includes an afro, puffs, curls, twist outs... shall I continue? Kinky and curly hair is already prone to tangles. When the hair is worn out for an extended amount of time that only increases the potential damage you are unknowingly causing. Which brings me to our next tip...

Tip #4: Protective Styling

If you’ve been following our blog for a while then you know we can be pretty serious about protective styling. In fact, most of 2011 Miss A was wearing protective styles and that just so happens to be the year she retained the most length. We even had a couple of Protective Styling Challenges that year (shout of to all participants!).

So, what is a protective style exactly? Well, that really depends on who you ask. If you want my opinion, it’s any style that requires no rubber bands or hair accessories (aside from the occasional headband or no slip bow, see part one) and falls under the following category:  Two/three strand twists, box braids, mini braids/twists, cornrowed/twisted updo's. See photos below for examples of a few of our favorite protective styles:


You can use the search box to the left to view more protective styles on the blog.

Most people will probably tell you a protective style is anything that hides the ends of the hair so no damage is being done, or something along those lines. While they are not wrong for thinking this, I don’t completely agree. Buns, for example, hide the ends; however, the bun could be pulling at the hairline, and in Miss A’s case, causing terrible tangling. There will be a lot of trial and error and ultimately you will have to do what works best for your child's mane.

Don't forget to be careful with how tightly you style your little one’s hair. If they are in pain, don’t just chalk it up to them being tender-headed. Try to be as gentle as possible, otherwise it defeats the entire purpose.

For us, protective styles last anywhere from one to six weeks so always remember to continue to moisturize the hair while it’s braided or twisted up. Bee Mine Juicy Spritz is simple and effective.

Tomorrow we will discuss the final two tips in this three part series so be sure to stop by and check it out. I will also be answering any questions or concerns you all may have. So, if there's anything you'd like to ask, be sure to leave a comment.

Let's Connect! | Facebook | Instagram | Pinterest | 

Monday, December 29, 2014

6 Tips To Healthy Natural Hair Growth (for kids!)


One of the most common questions I’m asked is “how can I make my child’s hair grow long?”, or some variation of that question. The simple answer to that is there is no magical potion (or, in this case, moisturizer). Now, while there is no way to make your child’s hair grow, don’t fret because there ARE steps you can take to assist in retaining length which will result in a healthy head full of natural hair. While genes play an important role in this process, I also believe that with proper care, anything is possible. Some quick hair facts:  each person has their own individual hair cycle growth phase in which their hair has potential to reach it’s longest (or, terminal length). Once the cycle is complete, it restarts (shedding, anyone?) and a new strand of hair begins to form. Hair grows about 6 inches per year, or half an inch per month, on average. If you do your part in caring for this length to the best of your ability, your little lady (or fella) is sure to have some long locks. In this three-part series, we are going to discuss 6 important tips on how you can help your child during their healthy hair journey.

I’m sure you’ve read some of these tried and true tips on the blog before but hopefully this series puts an end to this very common question.

Tip #1: Avoid hair accessories. 

"What? But they’re so cute!" I know, I know. This is a difficult one for mothers of little girls especially. We always want to match their hair beads and bows to their outfits but please keep in mind that these can do more harm than good.

Beads, for example: we use a rubber band to secure the beads at the end of the braid or twist. Remember, the ends are the oldest part of the hair, therefore, they need the most TLC. Tightly wrapping a rubber band around a small piece of hair and then adding weight from the beads is just asking for trouble! Please take into consideration that typically when parents and caregivers accessorize with beads, we usually leave them in for a few days, sometimes a couple of weeks. Imagine the pulling this is doing to those ends during that period. Overtime, the ends will become dry and brittle resulting in breakage.

Other hair accessories to avoid: Ponytail holders/hair ties (yes, even Goody Ouchless ones). Tight ponytails will inevitably pull on edges. Snaps/barrettes. Bows with metal closures.  

Tip #2: Moisturize! 

Well, duh. People tend to forget how important moisturizing the hair is. It’s easy to moisturize one time then forget about until the next wash day, especially during these Winter months. I strongly suggest a daily moisturizing regimen. Focus on the edges, nape of the neck and the ends.

My favorite moisturizer for my daughter (or holy grail, as we like to call it) is Bee Mine Luscious Moisturizer (use discount code: 15BBBSUM for 10% off or you can purchase on Amazon). We've been using this product for years and it has never failed me. Don’t forget to seal the moisture in with an oil. I like Extra Virgin Coconut Oil or Olive Oil.

Be sure to stop by tomorrow for part two of this three part series. We will be discussing the importance of protective styling as well as ways you can properly detangle your little one’s hair without the breakage (or tears!).

I’d love to hear your feedback. Do you have any tips you’d like to share or anything you’d like me to answer in our next post? Leave a comment below!


Let's Connect! | Facebook | Instagram | Pinterest | 


Wednesday, July 23, 2014

Long Time No See / New Discount Code

It's been so long, hasn't it?? No worries, we will be back with lots of updates soon!

Although I haven't been blogging much, I've obviously still been styling Miss A's hair. And, yes... we are still using our beloved Bee Mine Products, in-case you were wondering. Speaking of, we have a new discount code for our fabulous readers. (see below)
Preview / Styled with Bee Mine Luscious Moisturizer

Preview / Styled with Bee Mine Luscious Moisturizer


You can use discount code SUMMER14BBB to receive 10% off your purchase only at www.beemineproducts.com


Don't forget to follow us on instagram! @beadsbraidsbeyond and check us out on Facebook!


Saturday, May 10, 2014

Bee Mine Products Mother's Day SALE!

All styles here were created by me and in almost every single one of them I used Bee Mine Products. If you have been wanting to try these products or just need to stock up, now is the time! Receive 25% off today and tomorrow ONLY using discount code: MOTHER14BBB only at www.beemineproducts.com (my personal favs: luscious moisturizer and curly butter!)


All purchases over $50 will be entered to win a $40 gift certificate. Random winners will be awarded today and tomorrow.


Tuesday, December 3, 2013

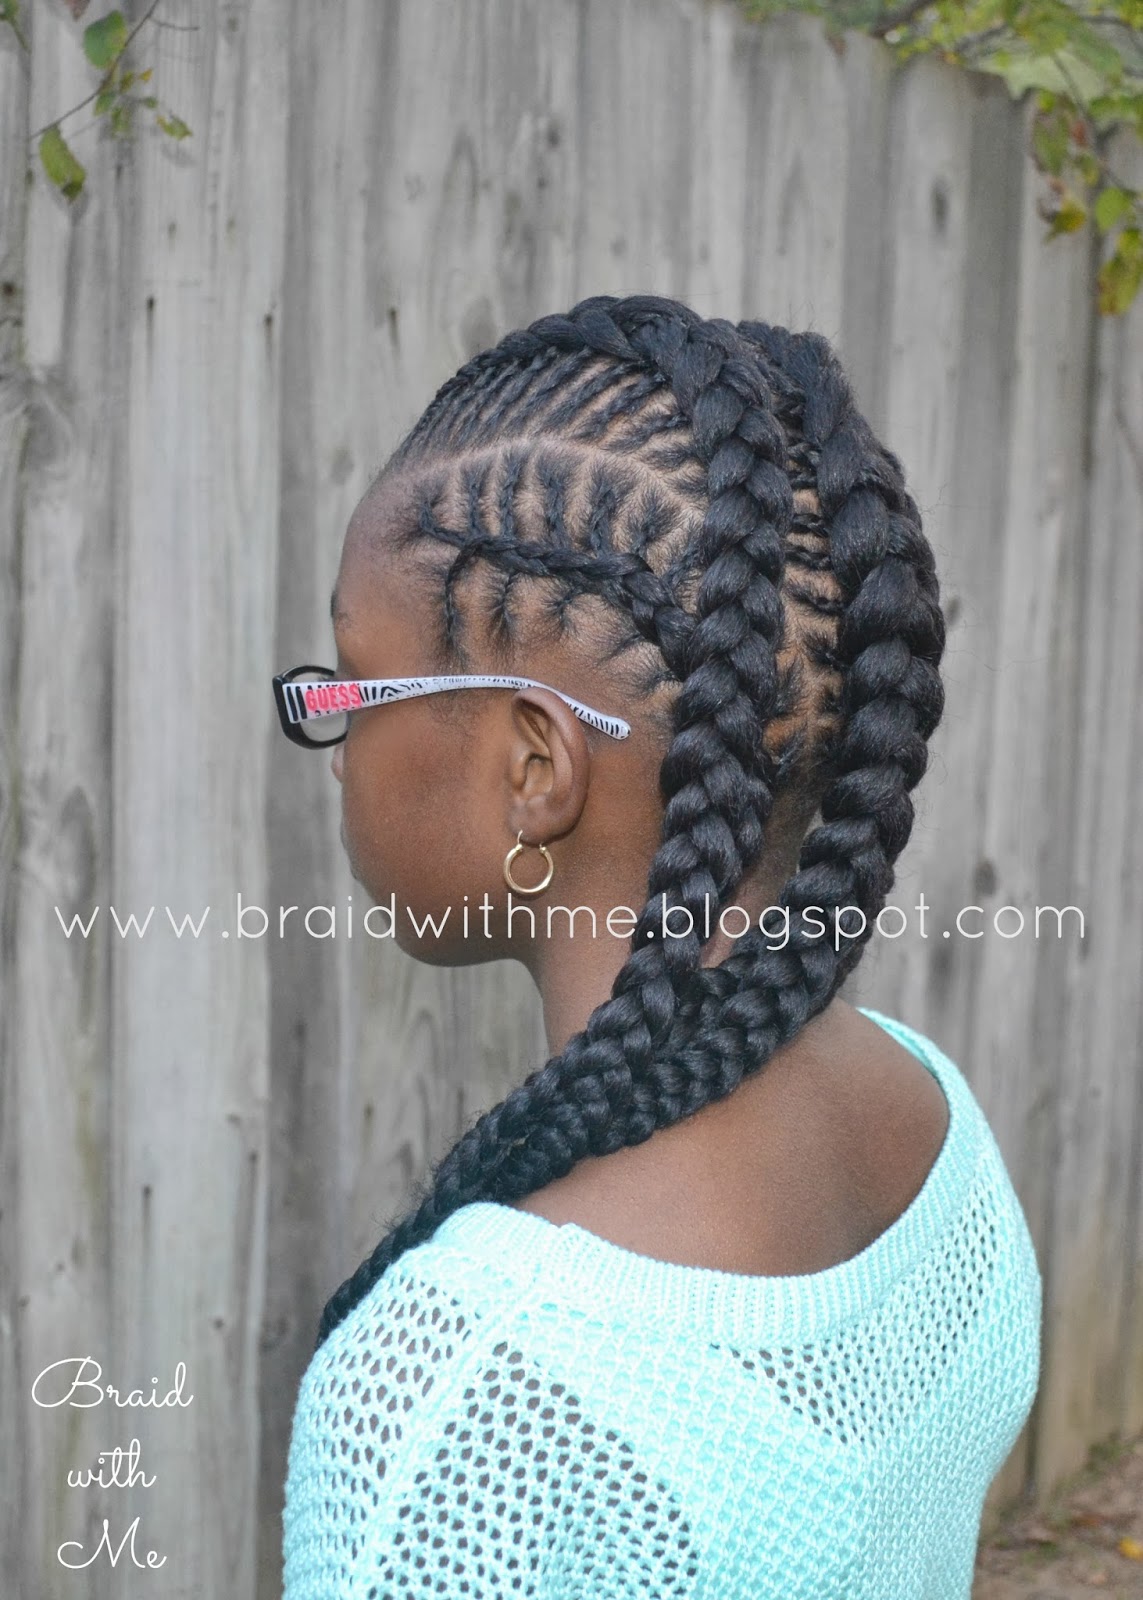
Natural Hairstyle for Kids: Fish Bone Cornrows

By Aisha of Braid with Me 

We're back with a new style!! It has been such a long time since our last post. Anisa is now a 4th grader!! Where has time gone?? My baby is growing up! 


The Style
For this style, I started with hair that was previously styled in several two-strand twist ponytails. I sectioned her hair into four sections, two on each side of her head. Next, I began parting and braiding her hair in a fish bone style. 

Sections A and D were cornrowed straight to the back. I began cornrowing Section B but stopped at the midway point. I began Section C the same way as Section B and continued it with the remaining hair from Section B. This section is labeled as Section B2 in the following picture. The remaining hair from Section C was cornrowed separately to form Section C2. 


This style can be worn straight to the back or to the side. You also have the option to pin it up into a cute bun. 


Products Used


FAQs
How long did it take? I did not complete this style in one sitting. I began braiding and took several breaks. 

How long will this style last? This style should last for awhile with proper care. However, she has school pictures coming up soon so she will get a new style. 

What will you do to preserve this style? Anisa will protect her hair each night with a satin bonnet. I will also moisturize her hair with a water and olive oil mixture that I have in a spray bottle. I will also use the As I Am Leave-In Conditioner as needed. 


If you're not familiar with fish bone cornrows, check out this tutorial that we did when Anisa was only 6 years old. She is really growing up! It's sad, but I am blessed to be able to experience this with her.  


Let us know what you think about this style by leaving a comment below. Also, is there a style that you would like for me to recreate or try? Let us know. I'm always open to new ideas! 

Wednesday, November 27, 2013

Bee Mine Products Black Friday SALE!


Our FAVORITE hair products, Bee Mine Products is having a HUGE Black Friday Sale! The sale starts TOMORROW at 8pm EST. For 2 hours only, you can get 40% off (Whoa!) your purchase (minimum $30) using our reader discount code: TKSBBB If you have been wanting to try these products, now would be the time. I'm not sure if I ever remember them having up to 40% off. O_O


On Friday, November 29th you can receive 30% off ($25 minimum purchase) using the same discount code: TKSBBB 


Your best bet is to try to be one of the first orders tomorrow night!

As for product recommendations, everyone knows our go to products are Luscious Moisturizer and Curly Butter. Their new kiwi strawberry scent is to die for!

If you have any questions, let me know. Happy shopping!

Cornrows & Sister (Rope) Twists


As promised, we're back with another new hair style for your girls! This style works for all ages, even adults. Read below to see how we achieved this look.

Miss A's hair had already been stretched out from her previous hair style (large cornrows), as seen on our instagram, @beadsbraidsbeyond (follow us!) so there was no need for banding this time around. As many of you know, I almost always style on stretched hair. Click here to see how banding works and how it stretches natural hair in preparation for styling.

Alright, so now that the hair is already stretched, I applied a little Bee Mine Luscious Moisturizer to her hair and gently detangled with a Denman brush. Once her hair was completely detangled, I began cornrowing the top of her hair straight back for about an inch or two. I didn't want to braid too far back because I wanted the twists to hang to the side (as shown in pictures). If you're not able to cornrow, you can always flat twist, or check out our Cornrowing for Beginners post. I ended each cornrow with a rubberband (not too tight!) and began doing a sister (otherwise known as rope) twist with the remaining hair.

Sister/Rope twists are actually very simple. Split the section of hair into two pieces and begin twisting one clockwise and the other counter-clockwise. So, you're twisting each piece in opposite directions while twisting them around one another. It sounds complicated but try it right now with your own hair. Ready? Grab a small/medium section of hair, split it into two, now begin twisting one piece to the right and twist the other piece to the left, now begin twisting those two pieces around one another while maintaining the clockwise/counter-clockwise motion. Got it? Good! If all else fails, check out some Youtube tutorials. We will be making one of our own in the near future!

Now that the top is done, I moved on to the back. I began at the nape of her neck, parting a small square with my rat tail comb, adding a little Curls Control Paste and twisting, as explained above. I didn't use a rubberband at the base because her hair type holds these twists pretty well. If you're working with a finer texture of hair, you may need rubberbands. I continued parting small squares through-out the back of her hair and twisting until the style was complete.


A common question I'm asked is how I get the ends to stay without using a rubberband. Once again, this has a lot to do with her hair type but, once I reach the end of the twist, I begin rolling the ends between my thumb and index finger several times to ensure they stay put. You can also use a little holding product (such as Curls Control Paste) for a little extra help.

This style is easy to maintain and very versatile. These twists should last between 1 and 2 weeks. Check out our Youtube channel to see how we remove the sister/rope twists.

Instagram saw this style first... Follow us for the latest hair happenings! :) @beadsbraidsbeyond Let us know what you think of Miss A's new style and stay tuned for more blog posts!


Interested in trying out Bee Mine Products (our fav!)? Well, we have a reader discount code for you! Use code: FALLBBB only at www.beemineproducts.com to receive 10% off. Happy shopping!

Tuesday, November 26, 2013

Cornrows, Twists & Hearts... Oh My!


Quite the combination, eh? See, what had happened was... I began styling Miss A's hair with absolutely no plan in mind. I think the outcome was cute and age appropriate for young girls, wouldn't you say?

Never mind that. I'm pretty sure you're all wondering where we've been... yes? Well, let's just say life happened. Between Lil Man being diagnosed with autism, Miss A being diagnosed with epilepsy, becoming a full time working single mom and almost everything you can think of in-between, it's safe to safe my hands have been full... and not with my daughters hair, as you can imagine! Ha. If you're interested in reading more about our personal life, feel free to stop by my other blogs Facebook page, Nik Gets Fit, chronicling my life and weight loss journey.

Just here for the hair? Got it! Let's get straight to the point...

I washed, banded and moisturized Miss A's hair as usual. If you've been following us for a while then you have probably already checked out her hair care routine, if not, click here for all the details including the products I use for this process.


Once her hair was banded, I parted the top section of hair from ear to ear and tied off the back. I began parting near her right ear first to begin the first cornrow. New to cornrowing? No worries! Check out our Cornrowing for Beginners post, here.

Once I had a few cornrows on each side, I decided to part a heart right on top. I'm not sure why, it just seemed like a good idea at the time. As you can see, my parting skills are a little rusty, I haven't done a heart in quite some time. As for how I parted the heart, well, it's actually very simple. Take your metal rat tail comb, and "draw" a heart in your child's hair. You may have to do this a few times. Always perfect your "rough draft" if possible! Once you have a shape that somewhat resembles a heart (haha), place that section of hair in a ponytail.

Alright, so now we have the cornrows, we have the heart... now all that's missing are the twists! I wanted larger twists so I twisted the remaining hair from two cornrows together at a time. I parted squares with the remaining hair in the back, placed a rubberband at each base, and twisted.

After about 1 week of wearing this hair style, I removed the two strand twists, creating a gorgeous twist out for Miss A's birthday party! Check out the pictures below. Shout out to Miss Teeny Fab Couture for making Miss A's custom Monster High birthday party outfit!


Want to stay up to date with Miss A's latest hair styles? Follow us on Instagram! @beadsbraidsbeyond

Stay tuned for another hair style this week! Yes, we're baaaaack!

Tuesday, September 17, 2013

Instagram Mail! Fishtail Braid


Miss A's hair was recently straightened. I did a quick fishtail braid before bed. Stay up to date on her hair happenings by following us on instagram- @beadsbraidsbeyond

Also, stop by and "like" our Facebook page!

Looking forward to seeing you there!


Friday, August 16, 2013

Bee Mine Products Back to School Sale!


Our FAVORITE hair products is having a BACK TO SCHOOL SALE! Starting tomorrow, Friday, August 16th - August 18th. Receive 20% off your purchase using discount code: BTS13BBB only at www.beemineproducts.com

They are also introducing their new curly butter scent, Kiwi-Strawberry... I can't wait to try it!!!


Monday, July 22, 2013

Enter to WIN! Lily & Beads Hair Accessories!


Updated: CONGRATS TO CHIQUITA WARD!


Lily & Beads offers a variety of cute hair accessories and styling tools for your children at affordable prices! 

Lily & Beads has generously offered one of our readers a nice sized lot of hair accessories (see photo below). Entering is easy! All you have to do is "like" them on Facebook. Be sure to enter via Rafflecopter below. This giveaway runs from Monday, July 22nd - July 29th. Best of luck and big thanks to Lily & Beads for this awesome giveaway!

This giveaway is open to U.S. residents only.


Tuesday, June 25, 2013

A Natural Updo: Rolled , Twisted and Pinned

By Aisha of Braid with Me

We're back with yet another natural updo! I created this style with a mixture of cornrows and two-strand twists. 


 The Style


The Dashiki

This beautiful dashiki was made by Charmaine of Tambo Collection. Charmaine was very helpful and prompt in answering all of my questions about our order. Our items arrived on time and in excellent condition. 

The following description is found on her Etsy page: 

Welcome to our world of African fabrics by the yard, and unique handmade clothing. "Tambo Collection" is North America's largest supplier for Kente and wax print fabrics. We also sell fat quarters for small projects. We ship fast, and if our item is not in stock we will notify you by email immediately. See our selection of our handmade premade head wraps and crowns. **We also have a selection of hard to find African ribbon and trimmings**


The dashiki can be worn as a dress or as a top. We also had the option of wearing it with or without the sash. Anisa absolutely loves her dashiki and as you can tell from the pictures, it fits her perfectly! If you are interested in purchasing one, the direct link will be provided below. 


Mtoto Nubienne Earcuffs for Little Girls

Did you notice the gorgeous little jewels gracing Anisa's ears? They are Mtoto Nubienne Earcuffs that were handmade by Ayida Honor. I first became acquainted with her special gift of jewelry design on her Etsy page, Native Style Beadery. She has since launched her own page, which can be found here. 

Upon one look at her handmade creations it is obvious that these items were made with love. Although the earcuffs that Anisa has were made for little girls, they are very durable. 

Be sure to check out her page, www.ayidahonor.com, and fall in love with her gift of intricate beadweaving techniques. 


We would love to hear from you! Be sure to leave comment below!