Showing posts with label curlformers. Show all posts

Saturday, February 26, 2011

Mini Twists Curled With Curlformers


I curled A's mini twists with Curlformers lastnight. I didn't add any product, just sprayed them with water to dampen them. She slept in them and these are the results. They curled really well. We both love the results.


In this video you can see how I put a couple of the Curlformers in. I used the extra long & wide Curlformer styling kit.


Monday, January 10, 2011

Box Braids and Cornrows


Another gorgeous style from Guest Blogger, Aisha and her beautiful daughter, Anisa!


Instructions:
  • Day 1: I made two cornrows in the front on each side and cornrows in the back. She has two ponytails on each side of her head in the front and a big ponytail in the back (center).
  • I added curl formers to the cornrows and the big ponytail in the back.
  • I tucked the big ponytail under to make a bun for school.
  • Later on Day 2: I added small box braids to the section where the big ponytail was.
  • I love how they turned out.
  • Once again I added the curl formers. I also added another cornrow in the front on each side.
  • Day 3: Curls!!! I love it!! But it's still not complete!
  • Later on Day 3: I added small box braids in the front where the two ponytails were. The style is almost complete!!!!
  • Curlformers on Day 3

The results:


Note: I used my own mixture of shea butter, coconut oil, vitamin E oil, and castor oil while braiding her hair. Anisa will have this style for as long as it looks good! I will moisturize daily and make adjustments/touch-ups as needed.

Thursday, October 28, 2010

Small Box Braids Curled With Curlformers


As previously mentioned, we have been very busy lately. Why didn't anyone tell me Fall was such a busy season?! Although I have been dying to try new things, from products to styles, I just don't have the time right now. I chose box braids (a favorite!) because they are long lasting and oh so versatile. Don't believe me? Search box braids in the search box, you will find lots of ideas! I'm sure I will be trying a few things from Guest Blogger Aisha's getting creative with box braids post. These are the smallest box braids I have done in A's hair, she has (I'm guessing) about 80 total. I wanted to make these much smaller but I knew that would be very time consuming so I settled for these. I think (hope!) we will get at least 3 weeks out of them. Oh, I guess I should add, she LOVES it! :)

Photobucket

What her hair looked like when we started and what her hair looked like when we finished.
Photobucket

Shrinkage.
Photobucket

Curlformers in.
Photobucket


At this point, I don't think you will need another set of instructions on box braids so I will just leave you with this short bullet list of things you may want to know:
  • This style took about 4 hours. I split it into two days, did a little more than half on the first day, then finished the rest the next day.
  • After washing and detangling her hair, I banded it up for one night. This didn't stretch her hair out very much, but it worked out fine. (see picture above)
  • I used Bee Mine Products for these box braids. I added a small amount of luscious moisturizer to each section, then a bit of curly butter on top.
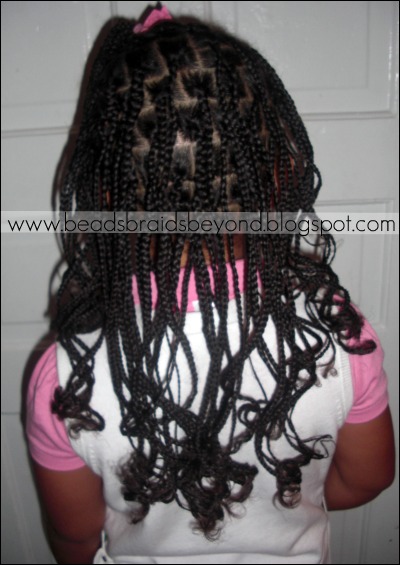
  • I wet her braids and added about 8 Long & Extra Wide Curlformers to her braids.
  • These gave her box braids a loose curl, next time I will use the extra long & wide Curlformers. Last time they gave her braids some gorgeous, long lasting curls.
  • I previously mentioned this, but I'll say it again. I always braid in the direction I want the braids to go. So on top for example, when I had about half of the right side done, I started braiding the rest of the right side to the left because I wanted them to fall that way for her side ponytail. Plus, I always love a side part.

I hope that about covers it! If you have any questions, please feel free to ask.

The back. It was interesting because when I pushed her braids to the front, they curled up a lot more.
Photobucket

Photobucket

Monday, March 29, 2010

Pretty Updo, Perfect for your Princess!

Photobucket

Photobucket

I decided to do a test run style on A. I'm still not sure what I'm doing to her hair for Easter (April 4th) but I'll figure something out. It might even be this style. This turned out to be a pretty updo. Perfect for special occasions, holidays, or whenever your little girl wants to feel like a princess!

For this style you will need: Setting lotion (or something with good hold), Curlformers (or other curlers), bobbypins, rubberbands/elastics, moisturizer, oil to soak rubberbands/elastics in.

I started off with stretched hair from banding. I applied some Giovanni Direct leave-in and coconut oil and detangled her hair. After detangling I parted a circle around her head, parting out between 1-2 inches of hair.

Photobucket

I added a generous amount of coconut oil on the hair that was left out. I then made a side part on her right side and began putting in the rubberbands. I didn't part as much hair out on the sides, so I only needed to use one rubberband for that, as I went back I split the section into two and used two rubberbands, then criss crossed each section to the back section and tied it off with my next section. I hope that makes sense.

Photobucket

She had more hair parted in the back, so it became a little difficult to go all around her head because her hair is thick. So what I did was I stopped right behind her left ear and tied the hair off. I then started a totally new section right by her left ear until I had no more hair.

For the hair that was left out of the rubberbands at the end, I put them in Curlformers and I put the rest of her hair in a ponytail (using a setting lotion) and added Curlformers to that as well. If you do not have Curlformers, you can use a different curler. Or for other options you can leave the middle out and natural, you can do the Princess Tiana Bun, you can do a twist out, etc.

Photobucket

About 2 hours later I took the Curlformers out and took each section of hair, flipped it under, and randomly placed bobbypins to hold the hair down. We put on one of her old Easter dresses and she felt like a princess! She went and got her white gloves and pranced around the house the rest of the day.

The results:

Photobucket

Photobucket

Photobucket

Photobucket

How is your child wearing their hair for Easter? Outfits picked out yet?

Wednesday, March 17, 2010

Review: Long & Extra Wide Curlformers on Mama!

Curlformers


Photobucket

Photobucket

I know you're probably thinking "Another Curlformer review?" lol, Yes! And there will be many more to come in the future. Anyway, after seeing how fabulous A's hair turned out from using Long & Extra Wide Curlformers, I wanted to try them to see if they would work on my hair. Well, they did! I loved the results, so I really wanted to share them with you all. :)

Photobucket

These are great because I don't have to use heat, or a curling iron to acheive this look. It took me 15-20 minutes to put them in, I showered, did house work, did my mommy duties, about 1.5 hours later I took them out and got this fabulous look! The only product I used was a setting lotion, on dry hair. I can't wait to try these again! I also want to add, my hair was way too long to get these close to the scalp, so if you have really long hair, just pull them all the way down until your ends are not sticking out, it still turns out really cute.

I love that I can put these in, in about 15 minutes at night, wake up in the morning and look somewhat glamorous. lol If you're a mother, you know we don't always have time to fix our hair, we're always worried about everyone else, right? So I think these are great for busy women.

In this next picture I combed all of my hair over to the side. Sort of an old school Hollywood look. I guess? lol

Photobucket

And in this next picture I put it in a side ponytail, left some of my bangs down, and added one of A's flowers for a different look.

Photobucket

Once again, If you would like to purchase Curlformers, they sell them on their website. They carry several different Styling Kits, along with Starter Packs. I would suggest buying a Styling Kit, which includes many Curlformers, two hooks, a cute bag to keep the Curlformers in, and an instruction sheet (around $60 US Dollars) because the starter packs are around $12 US Dollars, not including a hook. You can also find Curlformers at Sally's Beauty Supply, although they do not have a big variety.

I would like to thank Curlformers for allowing us to review their product.


Disclosure: The product(s) were sent to me free of charge from the company or PR agency for the purpose of this review. My opinions are my own and are not influenced by any other part.

Review: Long & Extra Wide Curlformers


Curlformers


Photobucket

I wanted to try the Long & Extra Wide Curlformers on A for picture day so I began preparing her hair a few days before. I added some shea butter mixed with coconut oil to her hair and banded her hair for several days to stretch it out. I have found that the best way to use Curlformers on A's natural hair is to stretch it out (banding, braids, twists) for a few days before, then on dry hair add a little moisturizer/leave-in with good slip (Giovanni Direct Leave-in) then use a setting lotion on each section of hair. I only used 19 Long & Extra Wide Curlformers for this look. I thought it came out absolutely adorable! Everyone thought I had used a curling iron to get the look, but nope! No heat at all! She just slept in the Curlformers overnight. Her ends were just a little frizzy because I didn't pull the Curlformer down all the way, but that was no big deal. It took about 30 minutes to put the Curlformers in, and 5-10 minutes to take them out the next morning.

This style lasted several days. It can last up to one week if taken care of properly. To maintain this style, moisturize as needed, and at night very gently pull the hair in a high, loose ponytail, ontop of her head so the curls don't get smushed, and put on her satin bonnet on or have her sleep on a satin pillowcase.


Here's some more pictures of her natural hair using Long & Extra Wide Curlformers with absolutely no heat!

Photobucket

Photobucket

If you would like to purchase Curlformers, they sell them on their website. They carry several different Styling Kits, along with Starter Packs. I would suggest buying a Styling Kit, which includes many Curlformers, two hooks, a cute bag to keep the Curlformers in, and an instruction sheet (around $60 US Dollars) because the starter packs are around $12 US Dollars, not including a hook. You can also find Curlformers at Sally's Beauty Supply, although they do not have a big variety.

Happy shopping!

I would like to thank Curlformers for allowing us to review their product.

Disclosure: The product(s) were sent to me free of charge from the company or PR agency for the purpose of this review. My opinions are my own and are not influenced by any other part.

Review: Extra Long & Wide Curlformers


Curlformers


Photobucket

Photobucket
I first tried Curlformers on A's hair in December 2009 and I have to be honest, at that moment, I was less than thrilled. While I wasn't very pleased with our first use, her hair still came out cute and she got a lot of nice compliments. I know that with anything new, you have to try it a couple of times to really get the hang of it.

So, I had a few problems on my first try, but I have found solutions since then.

Problem: The hook got stuck in the Curlformer netting a couple of times.
Solution: After giving it some thought, I realized I was trying to pull too much hair through the Curlformer too quickly. I slowed down a bit, and sectioned off less hair and viola, no more hooks getting stuck!

Problem: After putting the Curlformer on with the hook, you have to give the Curlformer back its shape.
Solution: This has rarely happened after my first try, but when it does, I very gently push the sides of the Curlformer so it curls up in the same direction.

Problem: She had white residue left in her hair. I used shea butter mixed with coconut oil, and ORS Lock & Twist Gel.
Solution: Use a setting lotion!! It works wonders. Soft bouncy curls with absolutely no residue.


What I did really like about Curlformers on our first try was they are easy to sleep on (I know this because I slept in them as well) and they seem to add more length than other curlers.

Here's a few more pictures:

Photobucket

Photobucket

The next time I tried the Extra Long & Wide Curlformers was January 2010. I decided to give them a go on A's box braids after flexi-rods did not curl her box braids properly (only her ends) and that is when I fell in love!

This is what her box braids looked like when I first put them in:

Photobucket

1 week later I washed her box braids and put about 2-3 braids in each Curlformer, she slept in them with no complaints, when I took them out in the morning her braids looked great! I put them in a side ponytail on top and left the back down.

Curlformers in:

Photobucket

Curlformers taken out:

Photobucket

Photobucket

I love that you can create fabulous curls (comfortably) overnight without having to use a curling iron, which may cause heat damage. I have been using Curlformers over all other curlers lately. They take a little getting used to, as far as getting the technique down, but are well worth it.

If you would like to purchase Curlformers, they sell them on their website. They carry several different Styling Kits, along with Starter Packs. I would suggest buying a Styling Kit, which includes many Curlformers, two hooks, a cute bag to keep the Curlformers in, and an instruction sheet (around $60 US Dollars) because the starter packs are around $12 US Dollars, not including a hook. You can also find Curlformers at Sally's Beauty Supply, although they do not have a big variety.

Happy shopping!

I would like to thank Curlformers for allowing us to review their product.

Disclosure: The product(s) were sent to me free of charge from the company or PR agency for the purpose of this review. My opinions are my own and are not influenced by any other part.