Showing posts with label veil. Show all posts

Tuesday, August 30, 2011

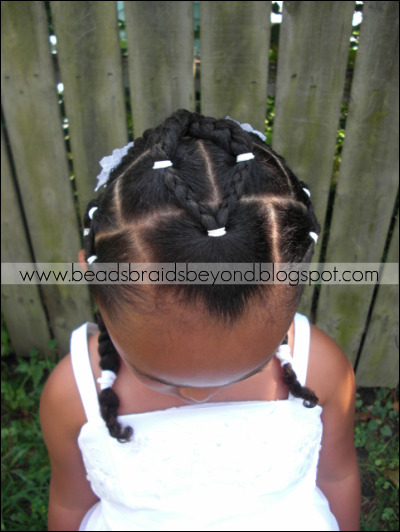
Quick Veil Style


A has been wearing her hair out in a ponytail quite a lot lately. I needed to do a quick style this weekend because she had a soccer game and I did not want her to be uncomfortable with her hair all out so I decided to do the style we all did in 2009 for our very first style challenge! Anyone remember?

Instructions:
  • I started with dry, stretched hair (from banding). I have also done this style on wet hair.
  • Part the hair from ear to ear. Make 4 large sections in the front and tie them all off with a ponytail holder. As you can see, I chose colors that matched her soccer uniform.
  • You are going to split the two middle sections into two and braid them half way down. Braid one braid with the side sections, again, only half way down.
  • Create two sections behind your middle sections. Take your one braid from the far left (near the left ear) and take your right braid from the right middle section, cross them over into the left back middle section and tie them all into the same ponytail holder.
  • Continue the process of crossing the braids over and tying them off. You should have a total of 8 sections.
  • You will now braid each of your 4 back sections into large single braids about half way down.
  • Cross your middle braided sections and pull them into a ponytail holder. You now have a few options. You can braid both sections down. Twist them. Or just create a couple of cute puffs!


Wednesday, August 18, 2010

Natural Flower Girl Hair Style: Quick Veil Style into Braids

Photobucket

Photobucket


Instructions:
  • Start with well moisturized, properly detangled, stretched hair. I stretched A's hair this time around with about 7-8 large single braids.
  • You will start by parting the hair from ear to ear. Tie off the back section to get it out of your way.
  • On your top section, part a square right in the front of the hair, place that section in a rubberband or ponytail holder. You will then part a square on both sides of your first section, place those sections in a rubberband/ponytail holder as well. You now have three sections in the front.
  • Split each front section into two and braid each section about two inches down. So you have a total of 6 half braids in the front.
  • Part right in the middle, behind your first square to start your back sections. Part a square slightly to the side then take one of your front middle braids and connect it into the back section.
  • Part a square next to your first back section square and once again, take the other front middle braid and connect it into that ponytail.
  • You will continue this process until you are done. Once complete, you should have 3 squares in the front, and 4 in the back. The ponytail squares in the front should connect to the back ones.
  • Braid the rest of the hair left over in your back sections, so you will have 4 medium/large braids.
  • Untie the back section, part it straight down the middle then cross over the two middle braids. Braid all the way down.
  • From there you just need to accessorize. I choose some flowers for this style but this can easily be dressed down. Choose colorful ponytail holders and fun accessories!

Tools Used:
  • Metal rat tail comb
  • Modified Denman D3 Brush
  • Bee Mine Products
  • Rubberbands, flower clips, ouchless ponytail holders

Total Styling Time: About 20-25 minutes

Photobucket

Photobucket

Monday, March 29, 2010

Pretty Updo, Perfect for your Princess!

Photobucket

Photobucket

I decided to do a test run style on A. I'm still not sure what I'm doing to her hair for Easter (April 4th) but I'll figure something out. It might even be this style. This turned out to be a pretty updo. Perfect for special occasions, holidays, or whenever your little girl wants to feel like a princess!

For this style you will need: Setting lotion (or something with good hold), Curlformers (or other curlers), bobbypins, rubberbands/elastics, moisturizer, oil to soak rubberbands/elastics in.

I started off with stretched hair from banding. I applied some Giovanni Direct leave-in and coconut oil and detangled her hair. After detangling I parted a circle around her head, parting out between 1-2 inches of hair.

Photobucket

I added a generous amount of coconut oil on the hair that was left out. I then made a side part on her right side and began putting in the rubberbands. I didn't part as much hair out on the sides, so I only needed to use one rubberband for that, as I went back I split the section into two and used two rubberbands, then criss crossed each section to the back section and tied it off with my next section. I hope that makes sense.

Photobucket

She had more hair parted in the back, so it became a little difficult to go all around her head because her hair is thick. So what I did was I stopped right behind her left ear and tied the hair off. I then started a totally new section right by her left ear until I had no more hair.

For the hair that was left out of the rubberbands at the end, I put them in Curlformers and I put the rest of her hair in a ponytail (using a setting lotion) and added Curlformers to that as well. If you do not have Curlformers, you can use a different curler. Or for other options you can leave the middle out and natural, you can do the Princess Tiana Bun, you can do a twist out, etc.

Photobucket

About 2 hours later I took the Curlformers out and took each section of hair, flipped it under, and randomly placed bobbypins to hold the hair down. We put on one of her old Easter dresses and she felt like a princess! She went and got her white gloves and pranced around the house the rest of the day.

The results:

Photobucket

Photobucket

Photobucket

Photobucket

How is your child wearing their hair for Easter? Outfits picked out yet?