Showing posts with label banding. Show all posts

Monday, March 11, 2013

Little Girls Natural Hairstyle: Flexi-rod Updo with Cornrows

Miss A's cousin, Lil Bit!

This hair style is absolutely adorable for little girls (and big girls!) and perfect for any occasion!

Tools needed:
  • Ouchless bands (for banding)
  • A brush for detangling (I used Denman D4)
  • A comb for parting
  • Green 1/4" Flexi-rods (6 come in each pack, I believe I used 5 packs)
  • A few bobbypins 
  • Rubberbands
  • Products for styling
I used the following products:
  • Bee Mine Luscious Moisturizer
  • Bee Mine Curly Butter
  • Curls (for Target) Curl Control Paste
 (Use code: BBBSPRING for 10% off your Bee Mine Products Purchase!)

Helpful posts:

Instructions:
  •  I washed and detangled Lil Bit's hair. After washing I applied a generous amount of Bee Mine Luscious Moisturizer to her hair from root to tip and banded her hair in 3 sections to stretch it for styling. (see photo below)
Instagram picture. Follow us @beadsbraidsbeyond
  • I left the bands on for a few hours. I prefer keeping the bands in overnight however we did not have enough time so once I removed the bands her hair was stretched but slightly damp.
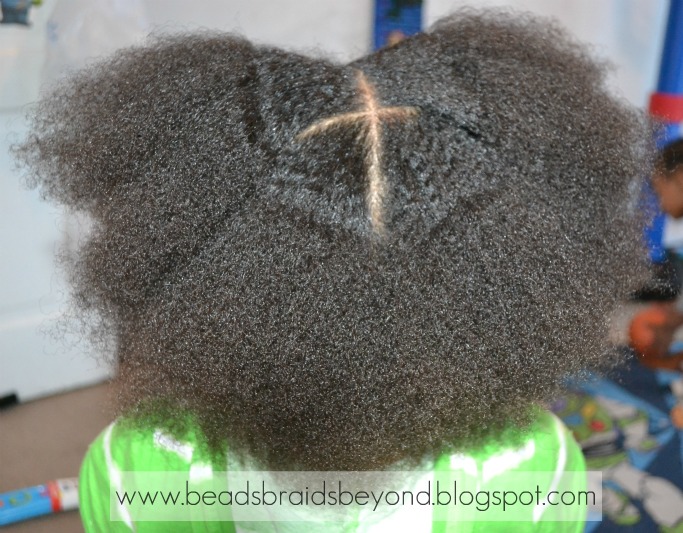
  • Using my comb, I parted a circle on the top of her head and tied it off. This section of hair is where I wanted the curls to be.
  • At the nape of her neck I began parting at a slight curve coming up to the top section of hair I had previously parted. I added a small amount of Bee Mine Curly Butter to each section I cornrowed and tied off each cornrow with a rubberband. 
  • Once all of her cornrows were in I grabbed the 1/4" green flexi-rods, applied an even amount of Curls Control Paste to 1 to 2 inch sections and rolled the flexi-rod on to the hair. Instead of bending the rods I simply put a hair tie on the ends to hold them in place. See picture below.

  • Her hair was already dry at this point so there was no heat involved. I never use heat when I use flexi-rods anyway which is why I use a product with good hold. I leave the flexi-rods in long enough for the curl to shape. I left these flexi-rods in for about an hour and a half while she played tea party with her cousins and sister.
  • After an hour and a half I gently rolled off each flexirod and used 3 bobby pins to pin any falling curls to the front. 
  • I added a small bow and viola! Beautiful!
Lil Bit absolutely loved her hair! She said she felt like she was in heaven and danced in front of the mirror for a good 30 minutes. Pleased indeed.


A few extras just in case you want to pin them on Pinterest!


Bonus! Stop by the blog later to see how I achieved Ky's twist out! (pictured below)


Let's connect!
 |Facebook | Pinterest | Instagram (@beadsbraidsbeyond) 
| Twitter (@beadsbraidsblog) | Youtube |

Looking forward to seeing you there! :)

Monday, April 16, 2012

Guest Post: Straightened Natural Hair for a Cut

By: Rae of Tweeny Hair

The ends of Syd's hair have been looking kind of rough for a while now. Several factors joined together to cause that damage, including the cold, dry winter, more "out" styles as she gets older, and the fact that Syd is learning to do her own hair. Let's face it - natural hair in the hands of a beginner is probably going to get a little damaged. No biggie, though. We just decided to cut the damaged ends off and keep moving. It's only hair...it will grow back in no time.

I usually trim her hair while it is in small twists (you can see a post about that HERE), but this time I decided to straighten it with a flat iron and then cut it. After all, it had been over 2 years since Syd's hair had been straightened. We were both interested in seeing how it looked all straightened out. Here's what we did:

Syd washed her hair and I detangled it, added some Bee Mine Luscious Moisturizer, and banded her hair overnight.

Starting in the back, I removed one section of bands. I added some heat protectant and used a flat iron (set to med-high) on somewhat small sections of hair at a time. I tried not to go over each section more than once, but I did need to make a second pass on a few sections. Bottom line, I used as little heat as possible to get the desired results. This took the first back section from this:

to this:

(Yes, I did this while we were both sitting on the floor....lol)

I then repeated the process for the other 3 sections of banded hair. When I finished, I was actually shocked that her hair reached her waist. I didn't realize it had gotten quite that long!

I let her wear her waist-length hair down for a day, but the following day I followed through with her hair cut. Instead of taking her to a salon, I opted to cut her hair myself. If you choose to do this, I cannot stress enough the importance of using hair shears. Do not use your regular household scissors, as they are not sharp enough to cut your hair cleanly. They can tug and pull at your hair as you're cutting, and you will have damaged ends on the hair that has just been cut. Talk about counter-productive! I digress...

I ended up cutting between 3 and 4 inches of Syd's hair, just to be sure we removed all the damage.
The shadows in this picture make the ends look really uneven, but by the time I realized it, her hair was no longer straight, so I couldn't take a better pic. :/


Day 3 of straight hair was Easter. Since her hair was still looking good, I decided not to do much styling. I just made 2 french braids around her hairline and brought them around to meet in the back. 4 minutes and we were done!


After 4 days of straight hair, Syd spent an afternoon being very physically active, so she got sweaty and her straight roots began to get puffy. We knew it was time to move into another style. She liked having her hair straight...she was amazed at how easy it was to comb. But that being said, she still truly loves big hair, so straightening will remain something that only happens on rare occasions. You just can't argue with her "bigger is better" hair theory!


Also - have you heard about our upcoming trip? After spending 9 days doing missions work in Guatemala last year, Syd and I are going back for an 8 day missions trip this August. You can read all about that on our MISSIONS TRIP POST and see more pics of last year's trip HERE. In addition to accepting donations, I am also using 100% of the proceeds from my etsy shop, HUFFLEBLOSSOMS, to pay for this trip. I would love for you to check out my shop, where you will find duct tape flower hair clips, fabric flower clips, and ladder ribbon jewelry. More items are added all the time, and I'm always willing to make custom pieces for anyone looking for specific colors, sizes, etc. You can contact me at huffleblossoms@gmail.com. Thanks to anyone who is able to help support us!

Sunday, April 15, 2012

Little Girls Hairstyle: Side Swept Two Strand Twists into Puff


Click photos to enlarge
I have a feeling you will be seeing a lot of Miss A's older cousin so let's go ahead and give her an alias. We'll call her Ky. Ky spent the night again this weekend and asked me if I could do her hair like her little cousins so of course I said yes.

I washed her hair with Cara B Naturally products (shampoo and conditioner). After washing I applied a generous amount of Bee Mine Luscious Moisturizer and banded her hair for the night (see picture below).


Banded hair
Stretched hair after banding

Ky's hair was ready for styling the next morning so I parted a square in the top middle section of her head. I cornrowed medium sections straight down and ended them in basic two strand twists.  I used Bee Mine Curly Butter for styling. I pulled her hair into a side puff with an ouchless ponytail holder and pinned her twists to the side near the puff. I added a headband and she was all done! She absolutely loves it. See more pictures below.


Here's Miss A's version in case you missed it. Check out the post here.

Miss A's version of this style.

Don't forget to "like" us on Facebook! www.facebook.com/beadsbraidsandbeyond


Thursday, March 22, 2012

Half Up, Half Down - Banded Natural Hair with Braid + Dealing With Epilepsy


Hey everyone! I know I haven't updated on the blog in a while but if you follow our Facebook page then you know we have been dealing with a lot here lately. As many of you may know, Miss A had 2 seizures last week, about 12 hours apart. She has absolutely no health issues that we were aware of and never had a seizure before in her life. She was in the hospital for a few days and there was talks of a tumor, brain infection and cysts on both sides of her brain. The doctor officially diagnosed her with having Epilepsy but we don't know what caused her seizures. This is still very new to us and it is terrifying. She is in seizure medication and she is doing better but she still has moments that seem off to me. She will be going in for another EEG in a couple of weeks. She will also be having a sleep study done and I am going to request another MRI because at first the doctor was sure she had cysts and now he "doesn't think" she does. I feel pretty clueless at this point but I am going to remain strong for my little girl. I will try to make a full post next week but I just wanted to update you all and let you all know that is is doing well and I thank you all so very much for your thoughts and prayers.

Picture of her when she was in the hospital. The day she went home. As you can see, she still wanted to play dress up, lol

As you can see from the above picture, Miss A's hair was stretched through banding. If you don't know what banding is, please check out our Banding F.A.Q. post *CLICK HERE* I banded her hair in a few sections for a couple of days using Goody Ouchless ponytail holders (they are very stretchy, cloth and metal free). I used Bee Mine Luscious Moisturizer (As you probably know, this is our fav. Discount code: BBBJAN will get you 10% off, good through March 31st, 2012 www.beemineproducts.com) I planned on styling her hair this week but nothing ever goes according to plan so I decided to do this quick style before we headed out to take Lil Man to speech therapy.  I parted her hair from ear to ear with my fingers. I loosely tied off the top section with a ponytail holder, I then made a space between her hair right above the ponytail holder and flipped her ponytail through that section. I braided the remaining hair and tied it off with another matching ponytail holder. I used a little Kinky Curly Curling Custard to smooth the top section down and viola! All done. Nothing too fancy but very easy and cute.

Don't forget to "LIKE" our Facebook page for more pictures and updates. Please feel free to ask questions and share your own pictures! :-)

xoxo, Nik


Saturday, October 22, 2011

Loosely Banded Ponytails

Click to enlarge

A's hair was banded overnight in 6 sections using Bee Mine Luscious Moisturizer (use our reader discount code: BBBFALL for 10% off your purchase) and unrefined coconut oil. I removed the bands in the morning, parted her hair straight down the middle and placed her hair in two low ponytails. I then loosely banded each ponytail and braided the ends. I will hopefully be styling her hair tomorrow so make sure you stop by! :)

Outfit: Gap during their 50% off sale items in-store only sale.

For more deals & steals and regular updates make sure you stop by and "like" our Facebook page!

Thursday, September 29, 2011

Big Natural Hair From Banding


Details:
  • A's hair was washed with Kinky Curly Come Clean Shampoo
  • After rinsing the shampoo I detangled with Herbal Essences Hello Hydration conditioner mixed with unrefined coconut oil and extra virgin olive oil (amazing detangling session!).
  • I rinse the conditioner and applied a very generous amount of Bee Mine Luscious Moisturizer (love that stuff! BBBHOT will get you 10% off your purchase)
  • I applied unrefined coconut oil and extra virgin olive oil over the moisturize
  • I banded A's hair in 5 sections
  • The next day I removed the bands, detangled with the Denman D3 and here are the results!
A great way to show off her big, long, natural hair without all the tangles.


Her outfit is from Gap during their 50% off previously reduced items sale. Check out our Facebook page and look in the album named "Deals & Steals" for more information. Don't forget to "Like" it while you're there! :)


Tuesday, September 6, 2011

Product Review: Darcy's Botanicals Pumpkin Seed Conditioner


Darcy's Botanicals Pumpkin Seed Curl Moisturizing Conditioner


The claim: It doesn't get anymore moisturizing than pure Pumpkin Seed Oil! This one is for all of our lovely regulars who have been requesting it for a while:) Our moisturizing conditioner will help to soften, moisturize and condition your coils. We scented this one with a sweet smell of pumpkin.


Price: $12.00 8oz

Ingredients: Distilled Water, BTMS (a mild conditioning emulsifier), Pumpkin Seed Oil, Organic Virgin Coconut Oil, Japanese Camellia Oil, Cetyl Alcohol, Botanical Oil Complex, Hydrolyzed Oat Protein, Panthenol, Phenoxyethanol, Caprylyl Glycol and Fragrance.

Review: A had worn her hair out/in a ponytail for about a week so her curls were very tangled. I decided to take a chance instead of using some of our good old faithfuls. I bought Darcy's Botanicals a few weeks before and posted a review on a couple of their other products here. I applied a generous amount of this conditioner to A's freshly washed hair. I have to say, this stuff smells amazing. It reminds me of one of my favorite Thanksgiving treats, pumpkin pie! I was surprised at how easily I was getting her tangles out with my fingers. The pumpkin seed conditioner is nice and creamy, with a medium to thick consistency, easy to work into the hair. I wanted to try this as a leave-in so instead of rinsing out, I left all of the conditioner in and went ahead and banded her hair (see picture above). A's hair was still not dry by morning so if I try it as a leave-in again, I will definitely do a quick rinse or squeeze excess conditioner out of her hair. I can't say I loved it or hated it as a leave-in. I love it for detangling though so I think I may just go ahead and keep this as a rinse out conditioner. Overall, it was yummy and I can't wait to try it again!

www.darcysbotanicals.com

Thursday, July 7, 2011

Mini Braids Are Out! + Big Hair


Outfit: Romper & Purse- GAP Outlet (they had a 50% off everything sale 4th of July weekend) Sandals- Crazy8 Sunglasses- GAP (retail)

A's mini braids are finally out! Can you believe they lasted 7 weeks? The take down took somewhere around 6 hours. I started taking them down last week and finished on July 5th so I was in no rush. I took the braids around her head out first and left the braids in at the crown because I knew I wouldn't finish in one day. It worked out perfectly because I could put her hair in a bun and cover the braids with ease. I rinsed her braids with water and used Herbal Essences Hello Hydration (old ingredients) conditioner and a metal rat tail comb. I put the end of the comb in every 2-3 stitches and smoothed one section of the braid out. Very easy!

Her hair was quite tangled on July 5th since I let her swim with free hair and braids at the crown on July 4th so it took about an hour for me to wash and detangle. I used Curls Curlicious Cleansing Cream and Herbal Essences Hello Hydration conditioner. I found a bunch of Herbal Essences conditioner with the old ingredients at Big Lots so I loaded up. I still haven't tried the new version. I used my fingers to detangle her hair first so there was no breakage. After finger detangling I used the modified Denman D3 brush.

After washing and detangling I banded her hair in 6 sections overnight (see below). I applied a generous amount of my love, Bee Mine Luscious Moisturizer to each section before putting the bands in. By the way, if you're interested in trying Bee Mine Products, they are having a 1-day customer appreciation sale on Saturday, July 9th, only. You can use our reader discount code: JULBBB for 15% off your purchase of $15 or more. Happy shopping!

I was going to put her hair in some big two strand twists today but she insisted on wearing her "big poofy hair" instead. :)


Ever wonder what happens to natural hair when it meets high winds? lol...

Tuesday, April 5, 2011

Banding F.A.Q.


Hair banded in 12 sections (we're preparing for something, stay tuned!)

Photobucket
Other banding pictures

Photobucket
2 banded ponytails worn as a style

What is banding?
Banding is a way to stretch the hair out without the use of heat (flat ironing, blow drying, etc, which may result in heat damage).

Why do you band A's hair?
I band A's hair because it's easier for me to style stretched hair and from my experience, the final result looks better after being styled on stretched hair. Some people choose to blow dry instead, but I want to stay away from heat as much as possible. After banding A's hair, she has little to no tangles so when I'm styling her hair I don't have to stop to remove knots. This speeds up the process, minimizes breakage and, I believe, helps A retain length.

Do you always band A's hair?
No. It depends on what style I have in mind. I almost always band A's hair before doing cornrows, sister twists and box braids. I prefer for her hair to be wet/damp if I'm doing regular two strand twists all over, twist outs and braid outs, to name a few.

How do you band A's hair?
I use cloth covered ponytail holders. They are not all created equal. I tried a different brand last Summer and they caused breakage so I stick with the ones pictured below. After washing and detangling A's hair, I grab a section of hair, add a moisturizer (usually Bee Mine Luscious Moisturizer), put a band/ponytail holder at the base and from there I begin spacing the ponytail holders half inch to an inch apart. I usually do between 3-6 sections on wet/damp hair but I recently did up to 12. The closer you put the bands, the more stretched the hair will be, also, the more sections you do, the more stretched the hair will be. This is completely up to you. I leave the bands in overnight. I also braid the ends that are left out of the bands.

Faded Glory Brand:


Goody Ouchless Brand: (the ones on the left)


Do I have to band?
Not at all. There are several different methods people use to stretch the hair. You can do single braids or twists, cornrows, etc. I do 6 single braids once in a while but I find banding works best. When I try other methods her hair usually still has quite a few tangles.

Does banding cause breakage?
For A? No. Like I said, I believe it helps her retain length since her hair is stretched out and tangle free. As previously mentioned, not all ponytail holders are created equal so you have to be careful about which ones you use.

As you can see below, these cheap ones I bought from a local dollar store broke her hair off. I also don't recommend using regular rubberbands for banding. Be sure to moisturizer the hair prior to banding. Also, be careful when removing bands and make sure you don't make them too tight.

Ripped open package
Breakage!

Banding results from using 12 sections overnight:


After removing bands, ends still braided.


After using the Tangle Teezer.


Banded style she wore to school.

More banding?

Monday, October 4, 2010

Band Out Waves

Photobucket

A's hair was in a simple banded style with two cornrows in the front for about 3 days. I used Bee Mine Luscious Moisturizer to band her hair. On the 4th day I removed all of the ponytail holders and the bands created a really cool wavy look. Sort of something like you would get from one of those hair crimpers. So, instead of banding her hair back up I decided to just let her wear it down. Don't you love accidental styles?

This is what her hair looked like before removing the ponytail holders:
Photobucket

What's going on with your child's hair lately?

Monday, July 5, 2010

"Hussheham" = Banded Ponytails?

Last night we were chatting and some how we started talking about hair. Well, A kept saying "hussheham" so I asked her what it was and she kept showing me her ponytails. She then s-l-o-w-l-y pronounced it for me and uh...I still didn't get it, lol. She said she likes "hussheham" better than "banded ponytail", and she wants everyone to call them husshehams. Kids...


Has your child ever came up with a hair style name?

Sunday, July 4, 2010

Triangle Banded Ponytails For The Fourth Of July

Photobucket

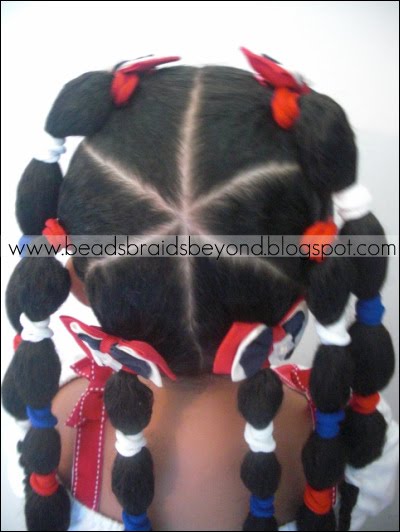
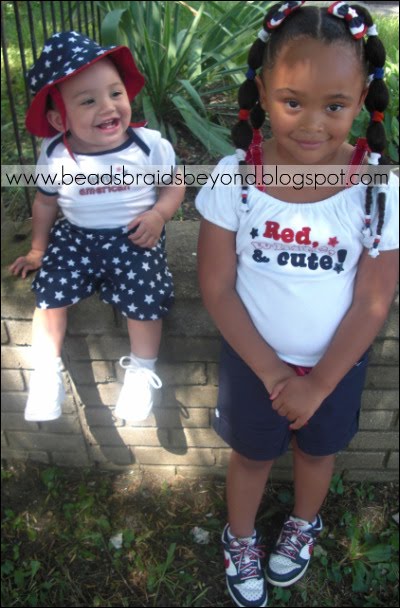
I decided to do banded ponytails for A's 4th of July style. I was going to cornrow her hair in layers but wanted something that wouldn't take a lot of time. I like the outcome. I think the parts kind of make it look like a star, and when I was looking at the pictures I thought her ponytails kind of looked like falling fire works because they were so colorful. Hope you like it!

The sun was in her eyes in this video. She was in a hurry (can you tell?) because she wanted to ride her bike. lol


Photobucket

Photobucket


How we acheived this look:
  • I shampooed A's scalp on Friday with Organix Coconut Milk Shampoo
  • After rinsing the shampoo, I conditioned and detangled A's hair with Bee Mine Conditioner. I finger detangled each section first, then combed through with a wide toothed comb.
  • After detangling each section I braided it up so it didn't tangle back up. I had about 4 sections total, so 4 braids. I rinsed the conditioner out while the 4 braids were in. See A's Hair Care Routine for more info on that.
  • After washing and detangling her hair was done, I removed each braid and added Bee Mine Deja's Hair Milk (review soon!) I banded her hair in 6 sections using Faded Glory Ponytail Holders. I spaced them half inch to an inch apart. When I got to the ends of each banded ponytail, I applied some Bee Mine Luscious Moisturizer and braided up the ends.
  • On Saturday evening I took down each banded ponytail, added more Bee Mine Deja's Hair Milk, gently brushed through with our Modified Denman D3 Brush, then banded the section back up. I added Bee Mine Luscious Moisturizer to her ends and braided the ends back up again. I did this to all 6 banded ponytails. This is what gave her final 4th of July Triangle Ponytail style a more smooth look and allowed her ponytails to hang a bit more.
  • I styled her hair today (4th of July), it took about 20-30 minutes total. I took down each section, gently brushed through with our Modified Denman Brush then I began making the triangle parts. Her hair was already split down the middle so I started in the middle of her part and parted each triangle. I tied each section off with a ponytail holder until I had 3 triangle parts on each side.
  • I used Bee Mine Curly Butter to smooth her edges down and to smooth each ponytail down, then I used Faded Glory Ponytail Holders to band each section, alternating the colors, red, white and blue. I braided the ends down and added some red, white and blue beads, with one white star bead on each braid. I also added last years Gymboree 4th of July bows to the front and back ponies.

Photobucket

A couple of pictures of A & Lil Man:

Photobucket

Photobucket

ATTENTION: Thought the red would get your attention. :P lol. I would like for next weeks Hair Share to be 4th of July themed. So if you have any patriotic hair styles or pictures, or just any pictures from the 4th of July please make sure you send them in! :) beadsbraidsbeyond@yahoo.com